Steps to Create a New Custom Access Role
- Authors:
- Created:
03/19/2021
- Modified:
05/18/2025
Before you Start
The Client Admin should have a good understanding of How Access Roles Work and of each of the Unique Access Roles Concepts BEFORE starting the process of Creating a New Custom Access Role.
Required Information
After confirming your knowledge of Access Roles, you’ll need to gather the information that’s required to Create a New Custom Access Role. The Information Required to Create a New Custom Access Role section listed below will outline all the information that’s required to Create a New Custom Access Role.
Information Required to Create a New Custom Access Role
Users that will be Assigned
Reports that will be Assigned
Getting Started
After you have gathered the Information Required to Create a New Custom Access Role, it’s time to start the processing of Creating your New Custom Access Role! The Overall Steps Steps to Create a New Custom Access Role section below will link to each of the remaining sections that will outline all the details required to Create a New Custom Access Role. The Information Required to Create a New Custom Access Role.
Overall Steps to Create a New Custom Access Role
Step 1. Selecting the Access Role Creation Method
The first step to Create a New Custom Access Role is to select the correct Access Role Creation Method. The Steps to Select the Create a New Custom Access Role Creation Method section listed below will outline each step that’s required to Select the Create a New Custom Access Role Creation Method.
Steps to Select the Create a New Custom Access Role Creation Method
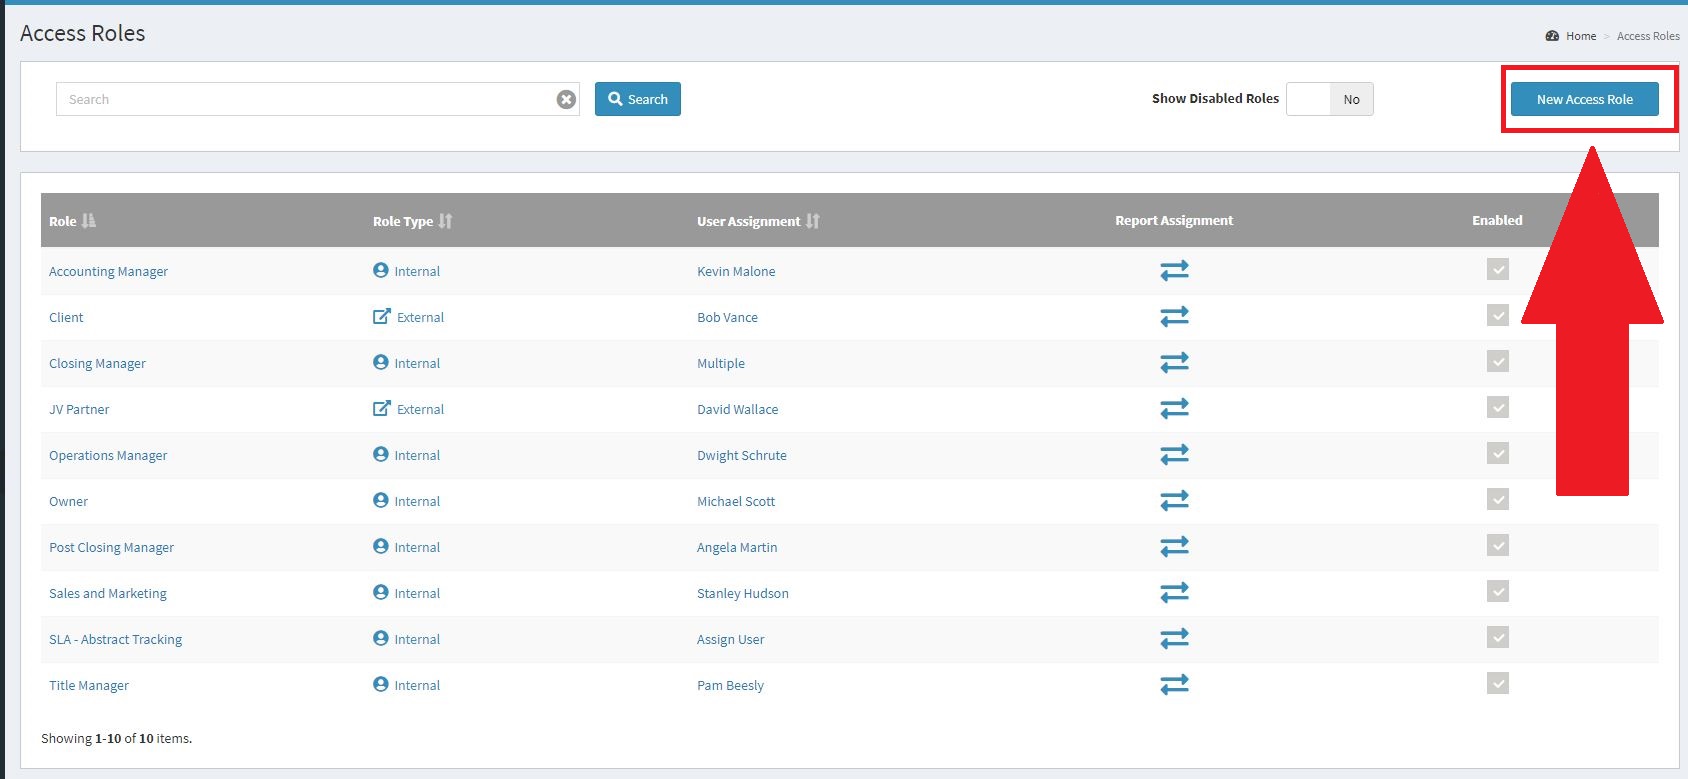
Navigate to the Access Roles section of Ops Insights.
Click the New Access Role button that appears in the top right-hand corner of the screen, to the right of the Show Disabled Roles switch. The Create New Access Role Button image listed below will show you where the New Access Role button appears in the Access Roles Section of Ops Insights.
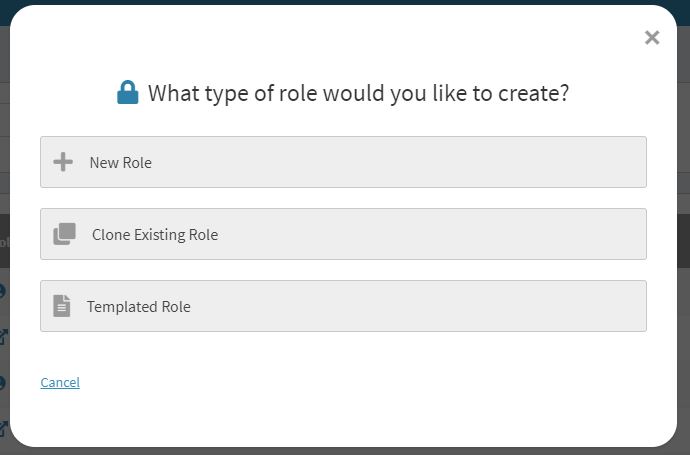
A new window will appear on the screen prompting you to select the type of Access Role you would like to create. There will be three tiles that appear on the screen that displays each Access Role Creation Method (New Role, Clone Existing Role, and Templated Role). If you hover over any of the Access Role Creation Method tiles the text will become Bold and the icon and border of the tile will change from grey to Blue. The Access Role Creation Option Window image listed below will show you what the Access Role Creation Option Window window will look like when it appears on your screen.
Access Role Creation Option Window
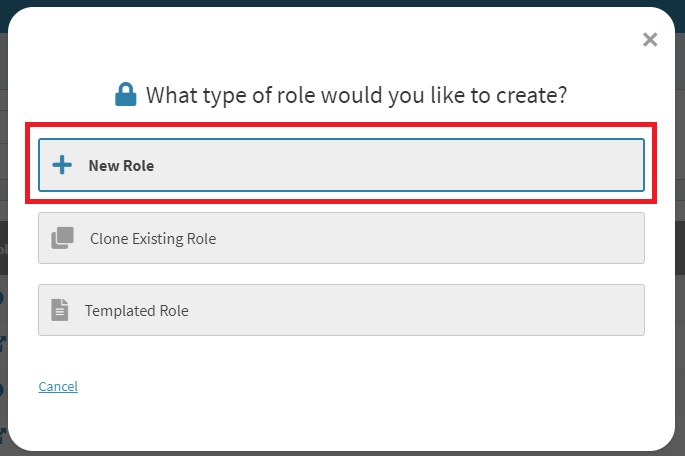
Click the New Role tile in the Access Role Creation Option Window. When you hover over the New Role tile, the text will become Bold and the icon and border of the tile will change from grey to Blue. The Create New Custom Access Role Tile image listed below will show you where the New Role tile will appear in the Access Role Creation Option Window.
Create New Custom Access Role Tile
After clicking the New Role tile, you will be redirected to the, you’ll be redirected to the Client Role Step screen, which is the first of Five Steps that will allow you to create a New Custom Access Role. You will need to complete all five steps to create your New Custom Access Role.
Step 2. Completing the Access Role Configuration Steps
Now that you have selected the creation method of Create a New Custom Access Role, you’ll need to configure your new Access Role. When creating a New Custom Access Role, no fields will be pre-populated and you’ll need to complete each step of the Access Role Configuration Steps.
Access Role Configuration Steps
Client Role Details Step
The Client Role Details step is the first step in the Access Role Configuration process and will allow you to assign a Name, Role Type, and Description to the new Access Role.
Access Role Type Selection
The Role Type you select for the new Access Role will only allow you to assign the role to certain users in your account depending on the type of user they are.
Internal Acess Role - If you select to create an Internal Access Role, only Internal Users will be available for selection in the User Assignment Step.
External Access Role - If you select to create an External Access Role, only External Users will be available for selection in the User Assignment Step.
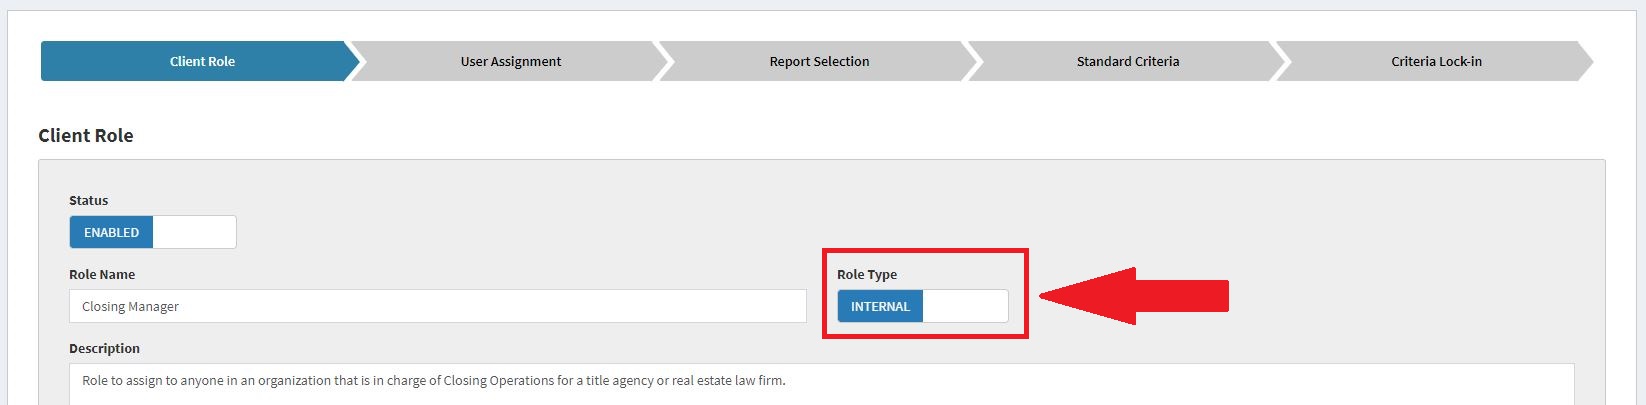
You can only assign Internal Users to an Internal Access Role and External Users to an External Access Role. The Internal Access Role Type Selection Example image listed below will show you what the Role Type switch will look like when it’s set to Internal.
Internal Access Role Type Selection Example
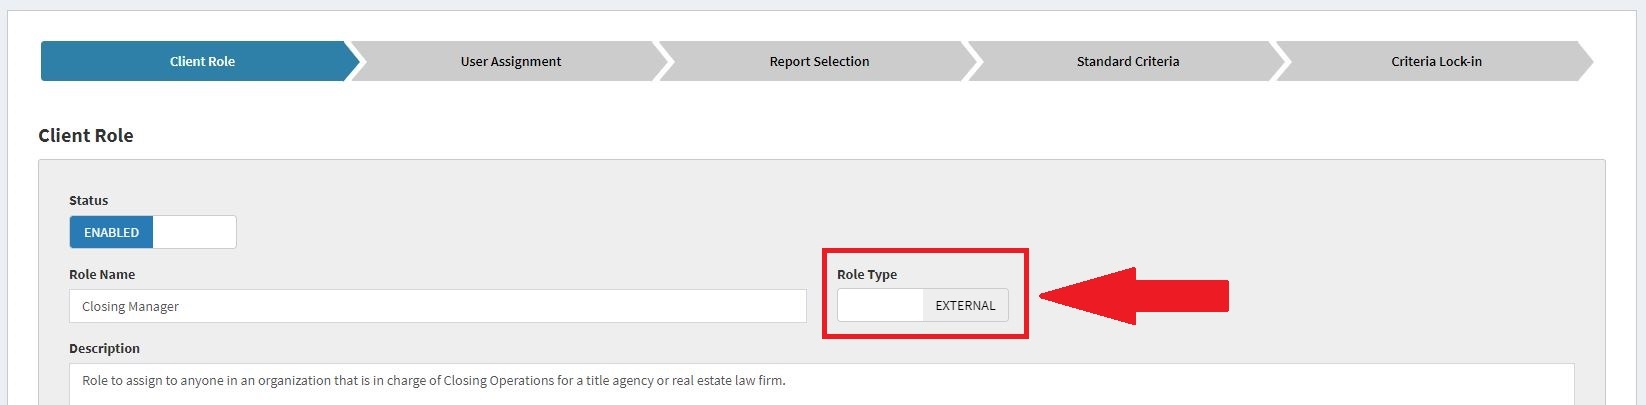
The External Access Role Type Selection Example image listed below will show you what the Role Type switch will look like when it’s set to External.
External Access Role Type Selection Example
Complete the Client Role Step
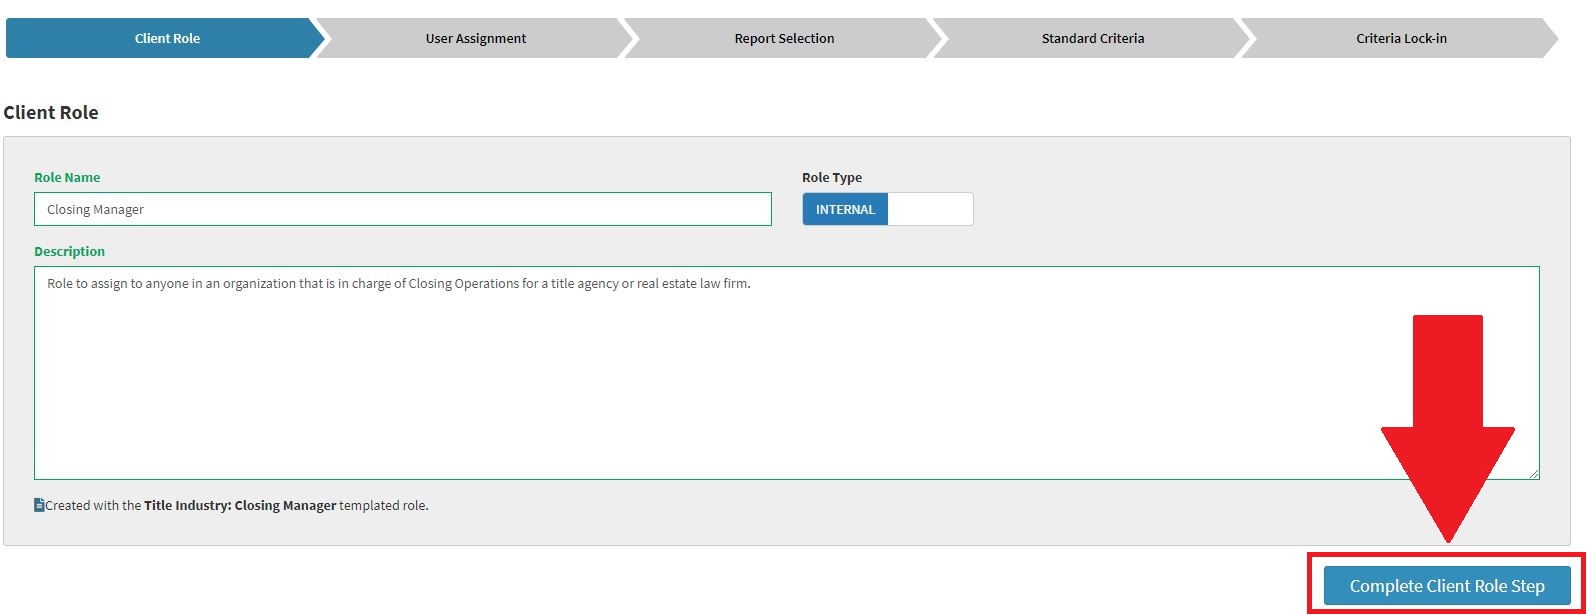
You must review the Role Name, Role Type, and Description fields and update any applicable information for the new Access Role you’re creating. Once finished, click the Complete the Client Role Step button to move on to the Next Step of the Access Role creation process. The Complete Client Role Step Example image listed below will show you what the Complete the Client Role Step button will look like.
Complete Client Role Step Example
Duplicate Role Name Warning Message
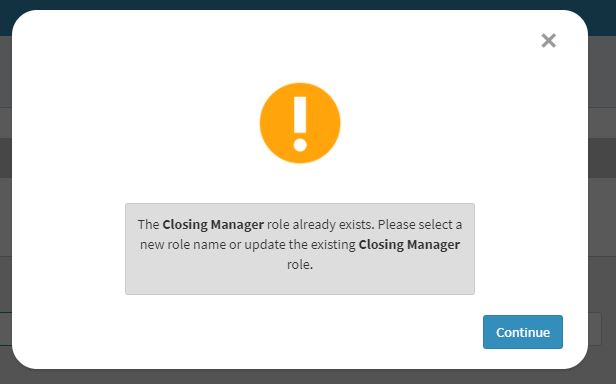
You can NOT use the same Role Name for multiple Access Roles. If you attempt to Complete the Client Role Step using a Role Name that’s currently in use, you’ll receive a warning message informing you the name you’re attempting to use is already in use and to provide a new Role Name for your new Access Role. The Duplicate Role Name Warning Message Example image listed below will show you what the Duplicate Role Name Warning Message will look like.
Duplicate Role Name Warning Message Example
User Assignment Step
The User Assignment step will allow you to Assign Any User in your account to the new Access Role depending on the Access Role Type you selected in the Client Role Step.
User Type Selection
Only certain user types will appear in the User Assignment step depending on the Access Role Type you selected in the Client Role Step.
Internal Users - Internal Users will be available for selection if you have selected to create an Internal Access Role.
External Users - External Users will be available for selection if you have selected to create an External Access Role.
You can only assign Internal Users to an Internal Access Role and External Users to an External Access Role. If you’d like to see which type of user is currently being displayed in the User Assignment Step, you can review the explainer text that appears above the user selection table. The User Type Selection Explainer Example image below will show you where to find the user assignment step explainer text.
User Type Selection Explainer Example

Adding/Removing Users
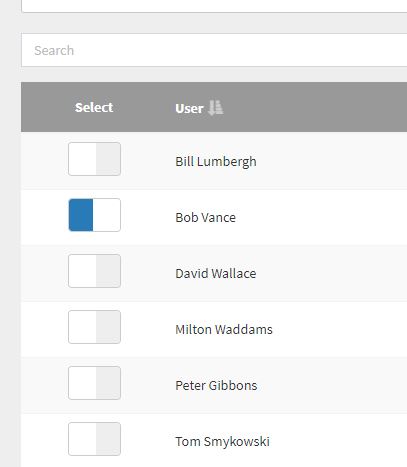
There will be a switch in the Select column that will allow you to add or remove a user to/from the Access Role. When the switch is Grey, it will signify a user is NOT currently assigned to the Access Role. when the switch is Blue, it will signify the user IS assigned to the Access Role. The Adding/Removing Users Example image listed below will show you what it will look like a user IS assigned to the Access Role and with a user is NOT assigned to the Access Role.
Adding/Removing Users Example
Complete the User Assignment Step
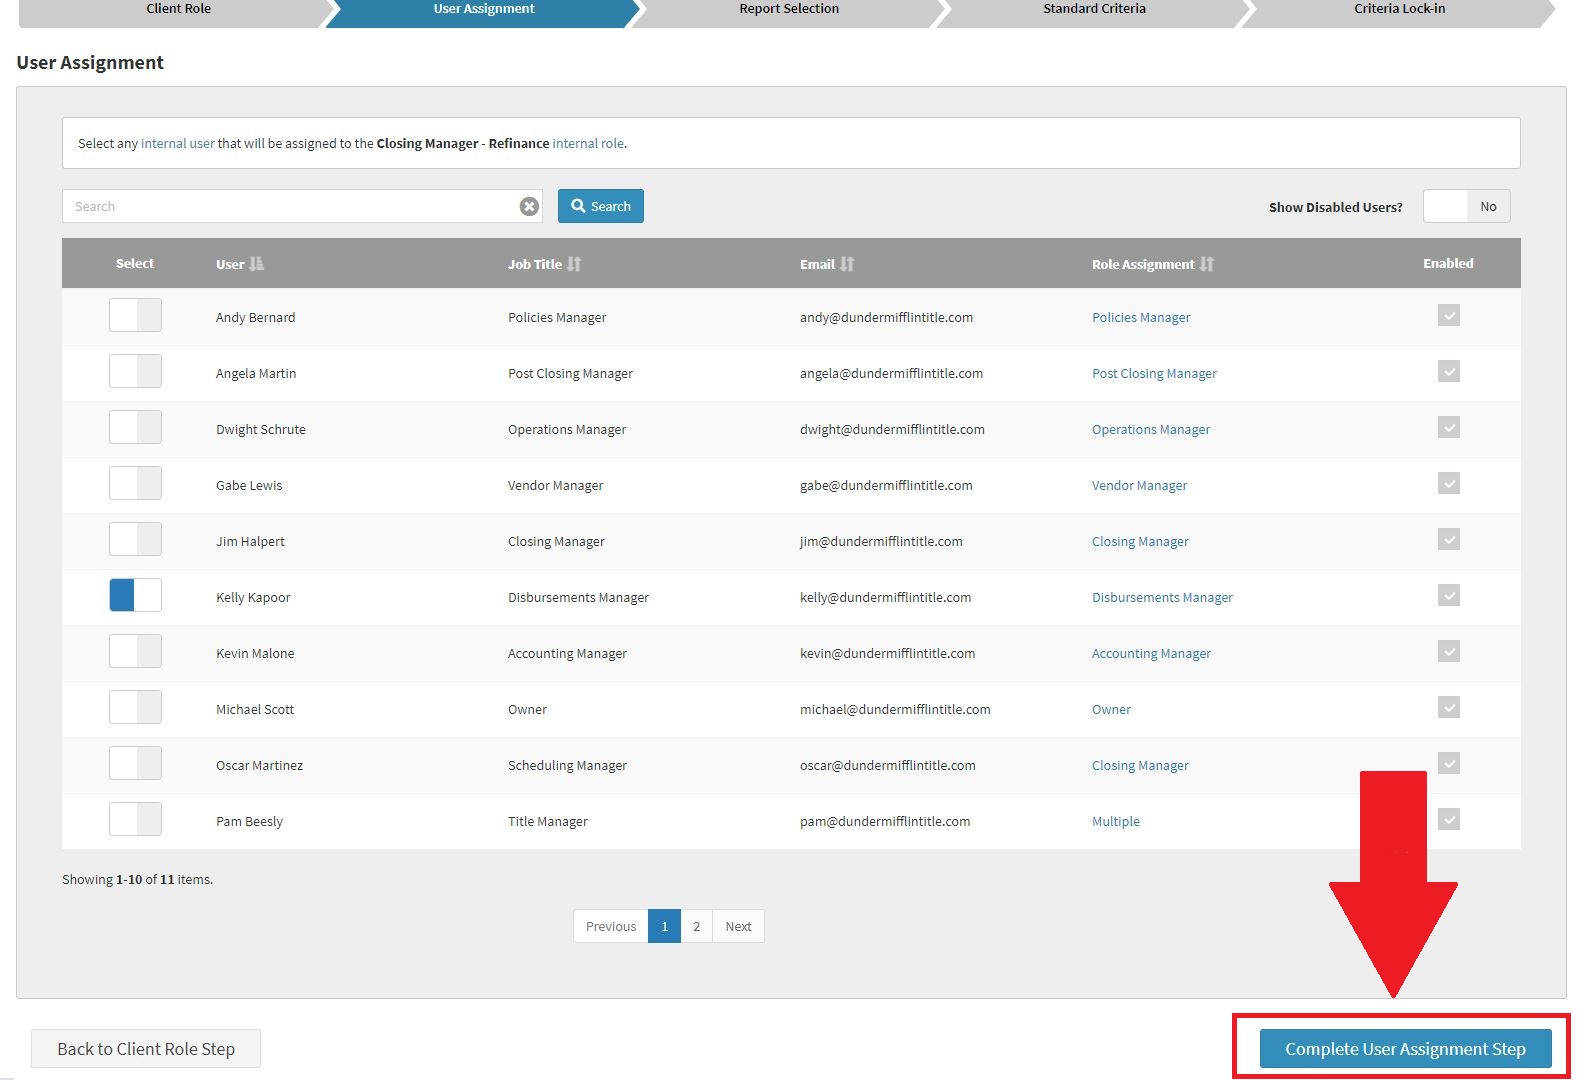
After Selecting the Users that should be assigned to the new Access Role, click the Complete User Assignment Step button to move on to the Next Step of the Access Role creation process. The Complete User Assignment Step Example image listed below will show you what the Complete the User Assignment Step button will look like.
Complete User Assignment Step Example
Report Selection Step
The Report Selection Step will allow you to Assign Any Report in your account to the new Access Role you’re creating.
Adding/Removing Reports
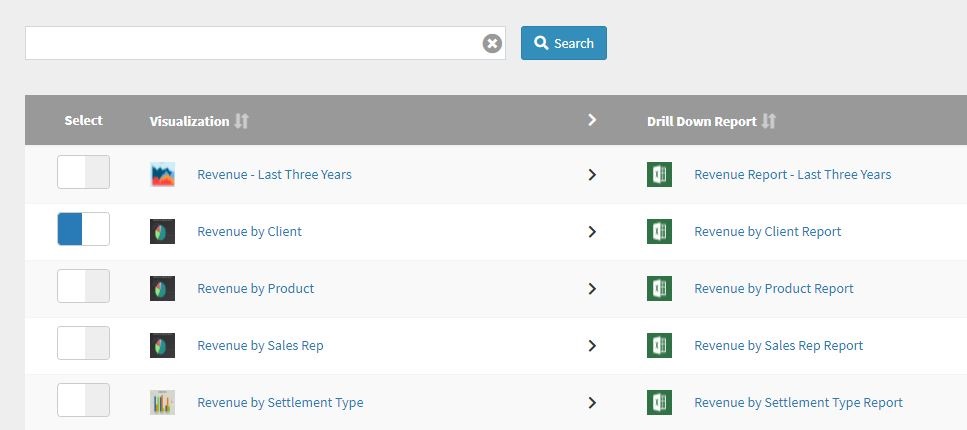
There will be a switch in the Select column that will allow you to add or remove a report to/from the Access Role. When the switch is Grey, it will signify a report is NOT currently assigned to the Access Role. when the switch is Blue, it will signify the report IS assigned to the Access Role. The Adding/Removing Reports Example image listed below will show you what it will look like a report IS assigned to the Access Role and with a report is NOT assigned to the Access Role.
Adding/Removing Reports Example
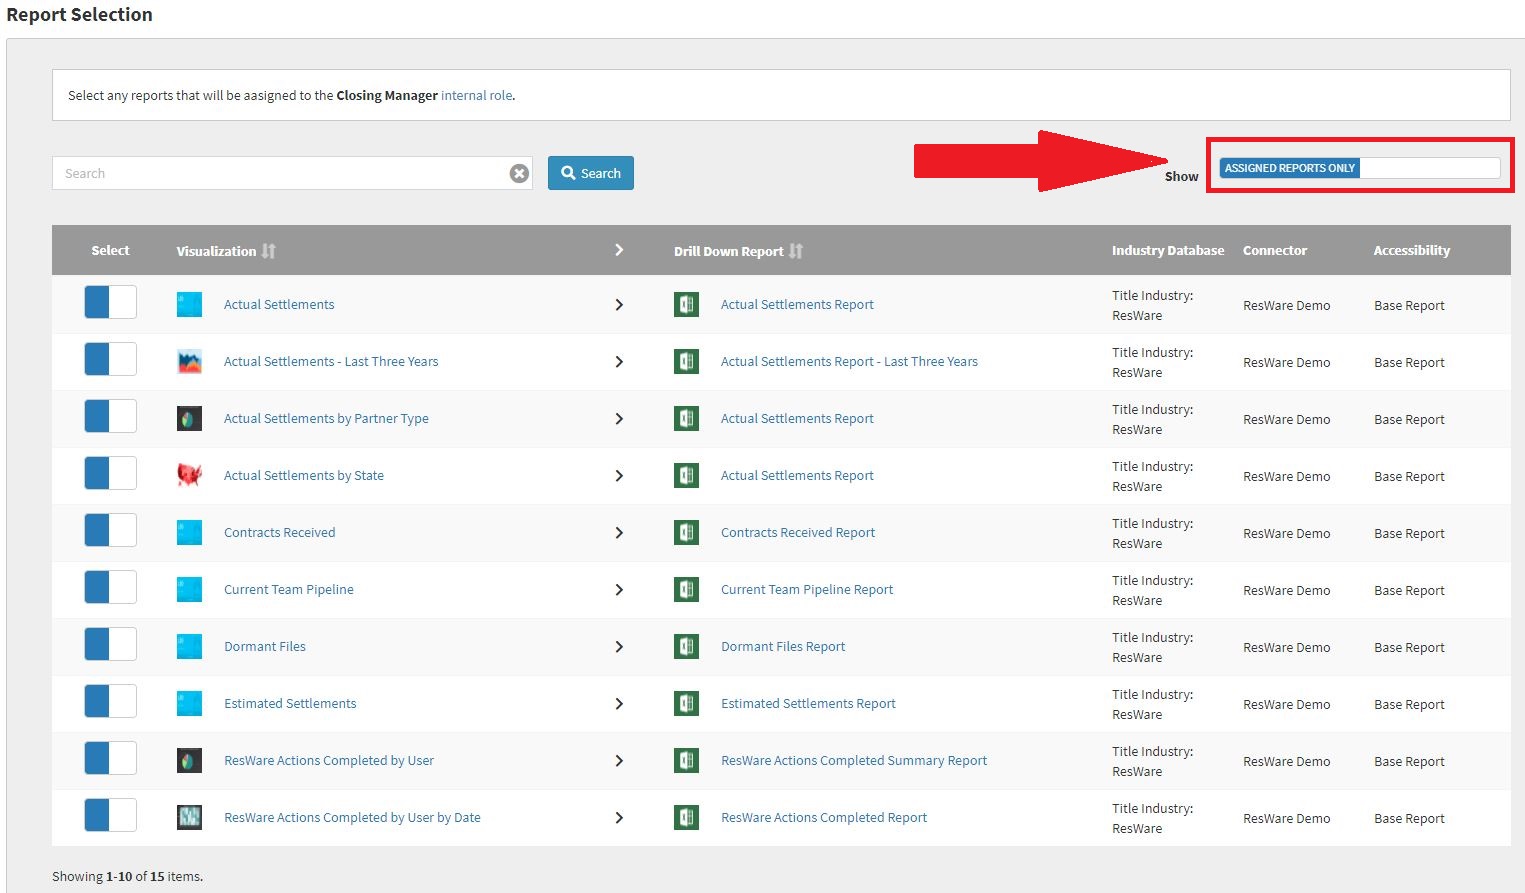
Show Assigned Reports Only Filter
Every report that’s assigned to your account will appear in the Report Selection Step. To make it easier to identify which reports are currently assigned to the Access Role, we’ve created a filtered view that will allow you to Show Assigned Reports Only. To enable the Show Assigned Reports Only filter, you’ll need to toggle the Show switch value from ALL REPORTS to SHOW ASSIGNED REPORTS ONLY. The Complete User Assignment Step Example image listed below will show you what the Show Assigned Reports Only filter will look like.
Show Assigned Reports Only Example
Report/Connector Assignment
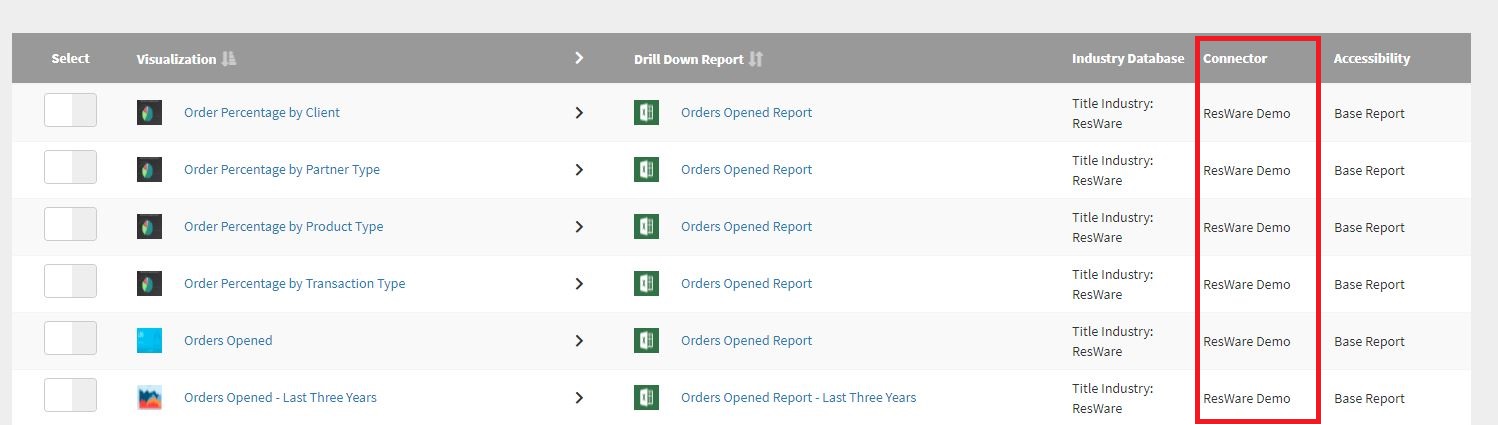
If you have multiple connectors enabled in your account, each report that’s currently assigned to your enabled connector(s) will appear in the Report Selection Step. It will be very important to thoroughly review the Connector column in the report selection table when Assigning Reports to your new Access Role to ensure you’re Selecting the correct reports. The Report/Connector Assignmen Example image listed below will show you what the Connector column will look like in the Report Selection Step.
Report/Connector Assignment Example
Complete the Report Selection Step
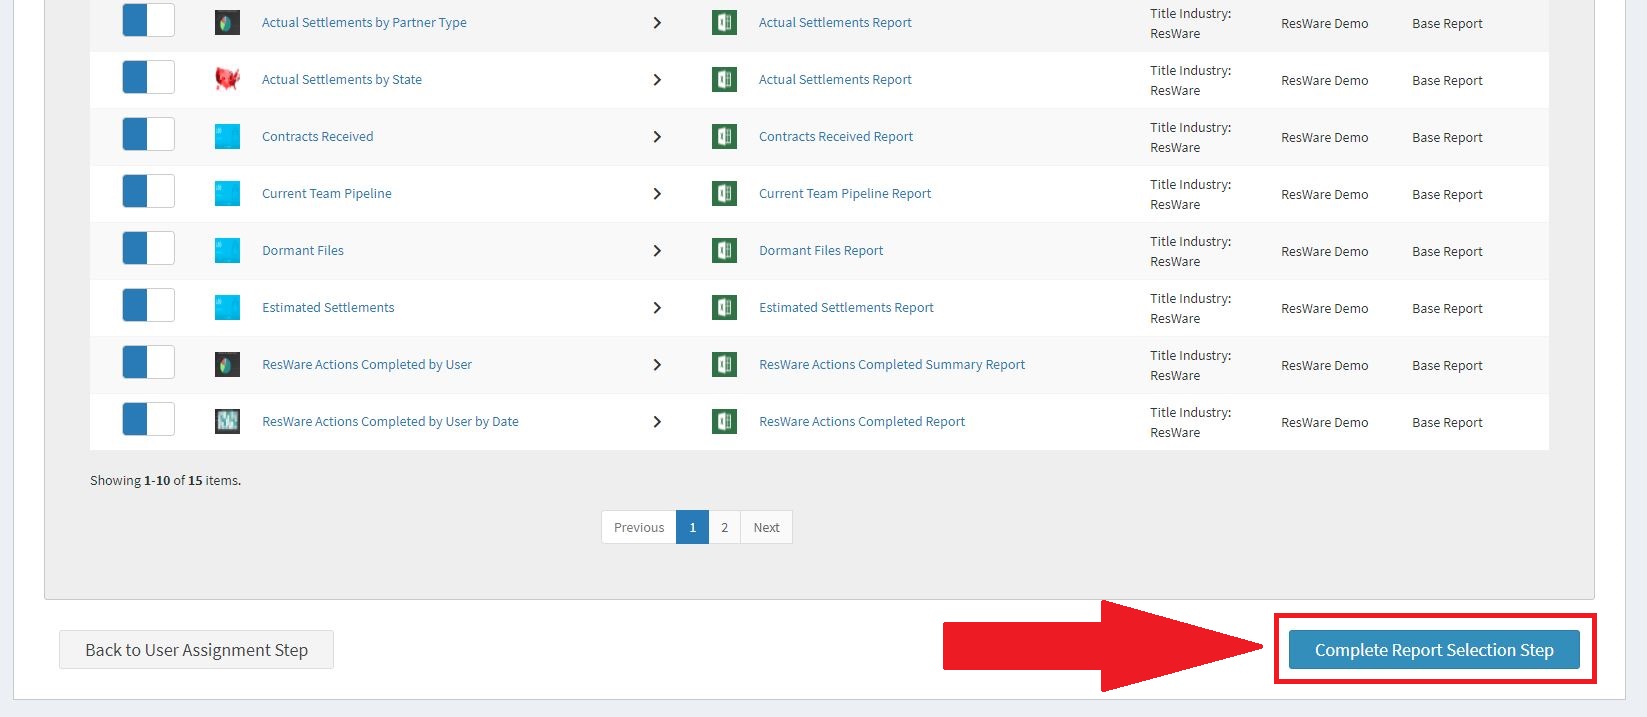
After Selecting the Reports that should be assigned to the new Access Role, click the Complete Report Selection Step button to move on to the Next Step of the Access Role creation process. The Complete Report Selection Step Example image listed below will show you what the Complete the User Assignment Step button will look like.
Complete Report Selection Step Example
Standard Criteria Step
The Standard Criteria Step will allow you to select default Standard Criteria values for the Access Role you’re creating. Any default Standard Criteria values selected in the Standard Criteria Step will be assigned to any reports that are Assigned to the new Access Role that have the Standard Criteria assigned to them.
An Example of this is if you select a default Standard Criteria value of Open for the Current File Status Standard Criteria, the default value of Open will be assigned to any reports that have the Current File Status Standard Criteria assigned to them.
Selecting Default Standard Criteria Values
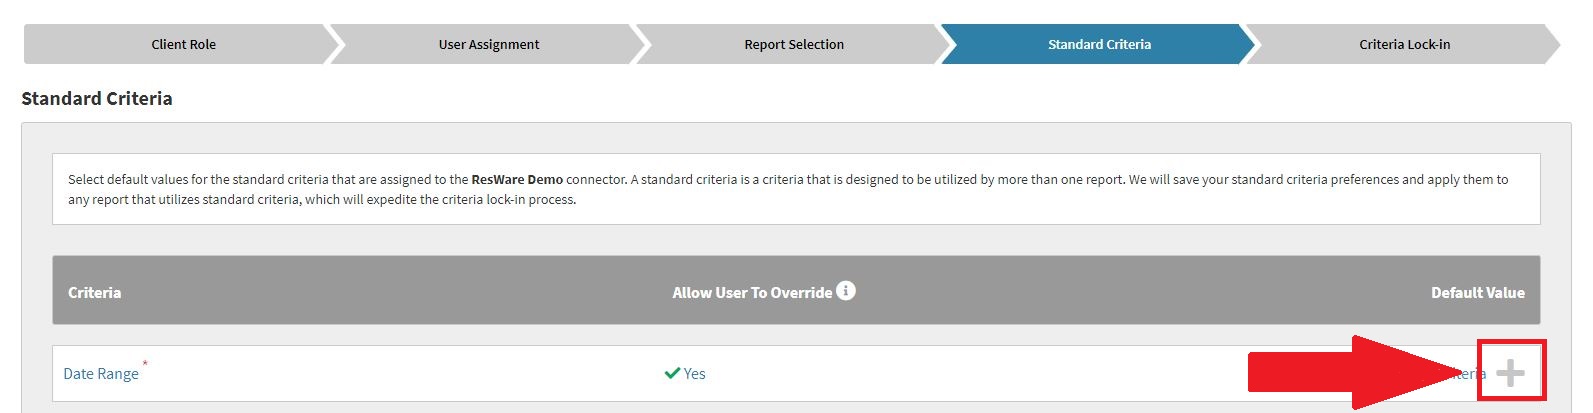
Whether you’ve Reviewed the Selected Default Criteria Values and would like to update them or you would like like to select new default standard criteria values, the steps are the same. To select a default standard criteria value, you’ll need to click the Plus icon that appears to the right of each Standard Criteria to Expand it. The Expanding Standard Criteria Example image listed below will show you where the Plus icon will appear on a Standard Criteria.
Expanding Standard Criteria Example
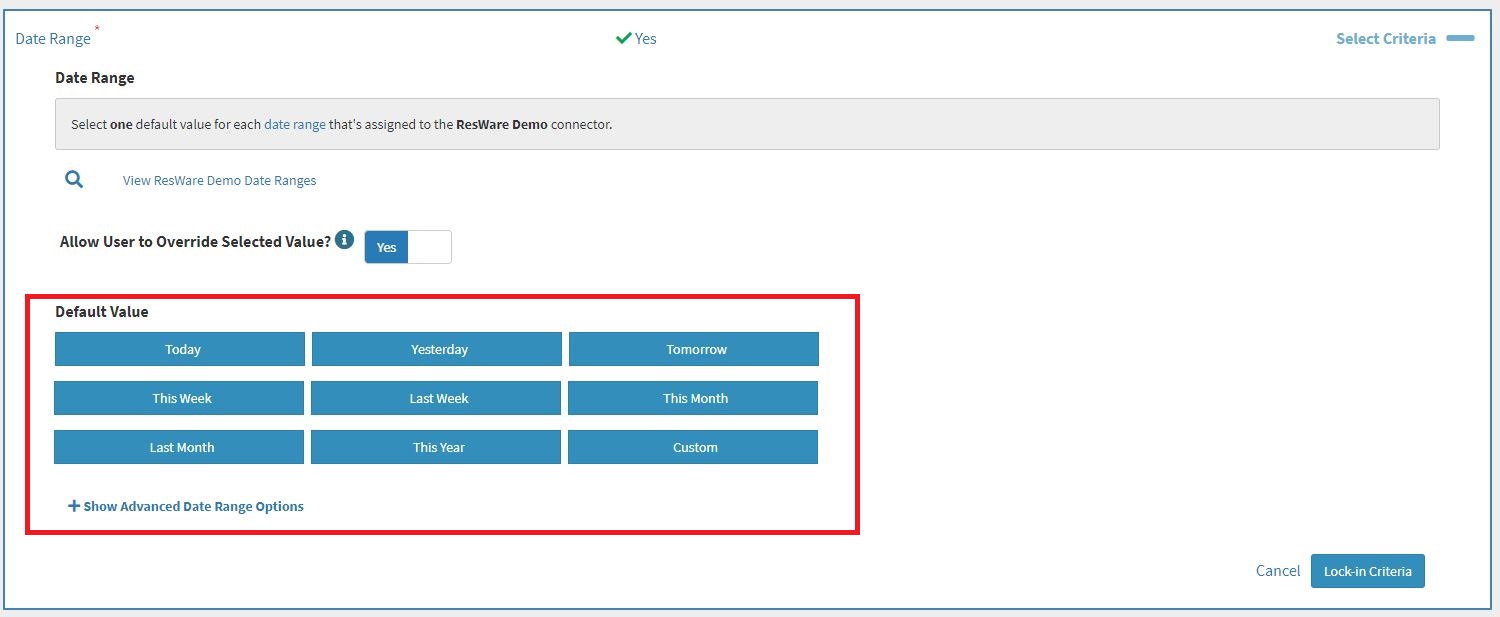
Once expanded, you’ll need to select/enter a value in the Default Value section of the Expanded Standard Criteria. There will be different types of selection options in the Default Value section of the Expanded Standard Criteria depending on the criteria type that’s assigned to the Standard Criteria. The Date Range image listed below will show you what the Date Range selection options in the Default Value section of the Expanded Standard Criteria will look like.
Date Range Example
The Multiple Selection Example image listed below will show you what the Multiple Selection List selection option in the Default Value section of the Expanded Standard Criteria will look like. The text Select … will appear in the Multiple Selection List input field, which will inform you that the criteria is a Multiple Selection List.
Multiple Selection Example
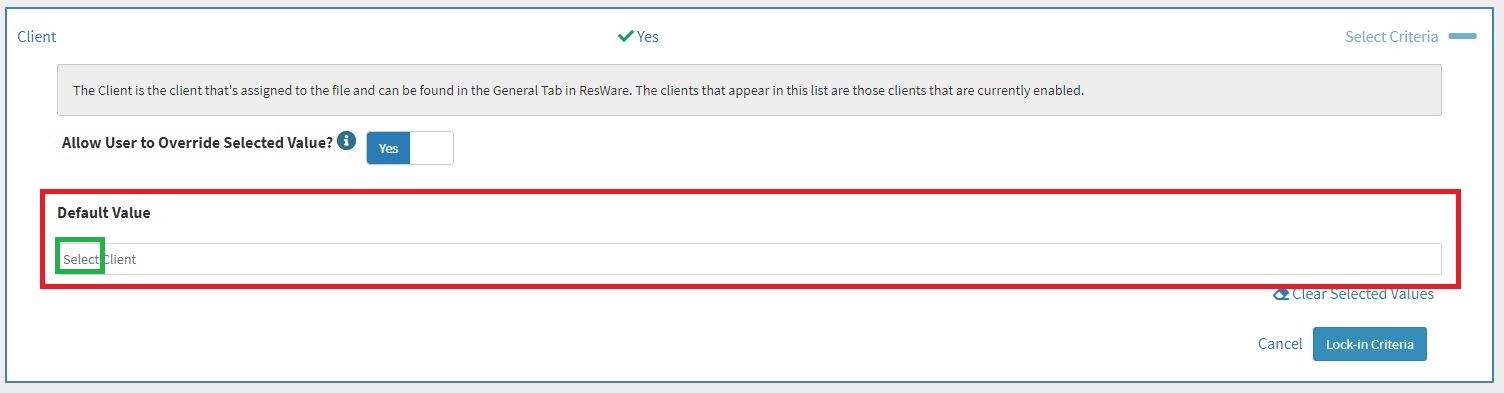
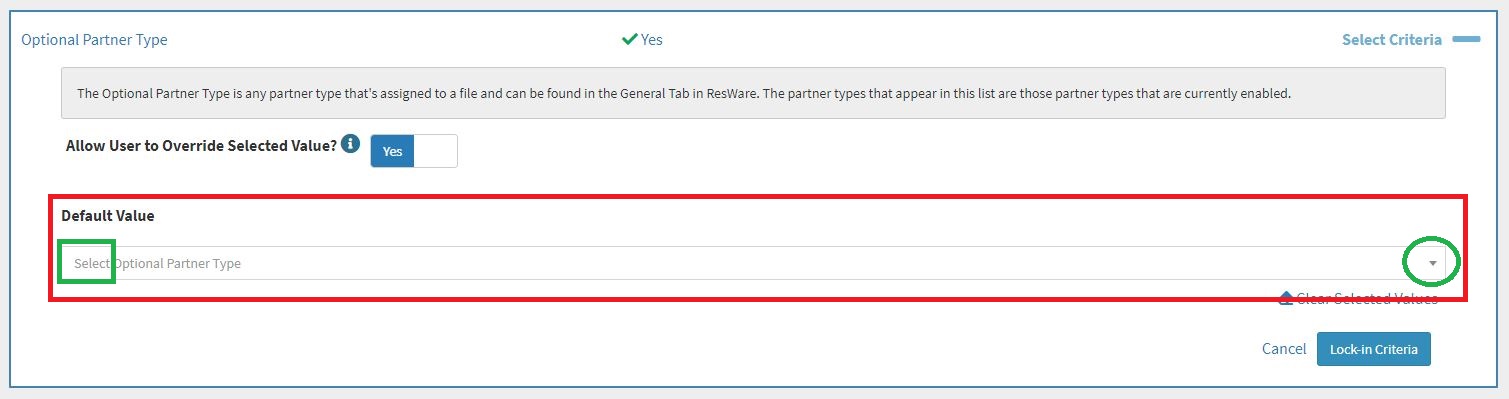
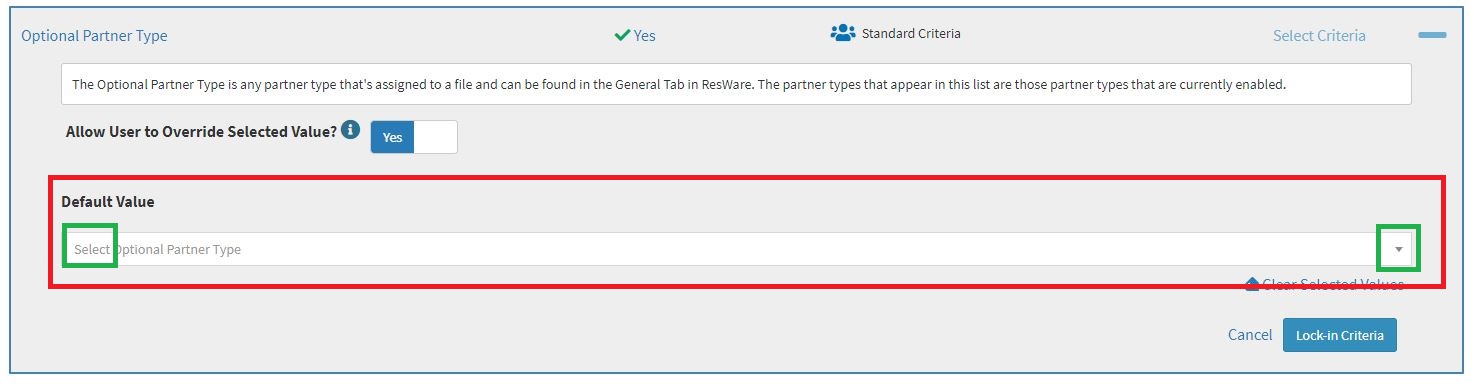
The Dropdown List Example image listed below will show you what the Dropdown List selection option in the Default Value section of the Expanded Standard Criteria will look like. The text Select … will appear in the Dropdown List input field AND a Down Arrow will appear to the right of the Dropdown List input field, which will inform you that the criteria is a Dropdown List.
Dropdown List Example
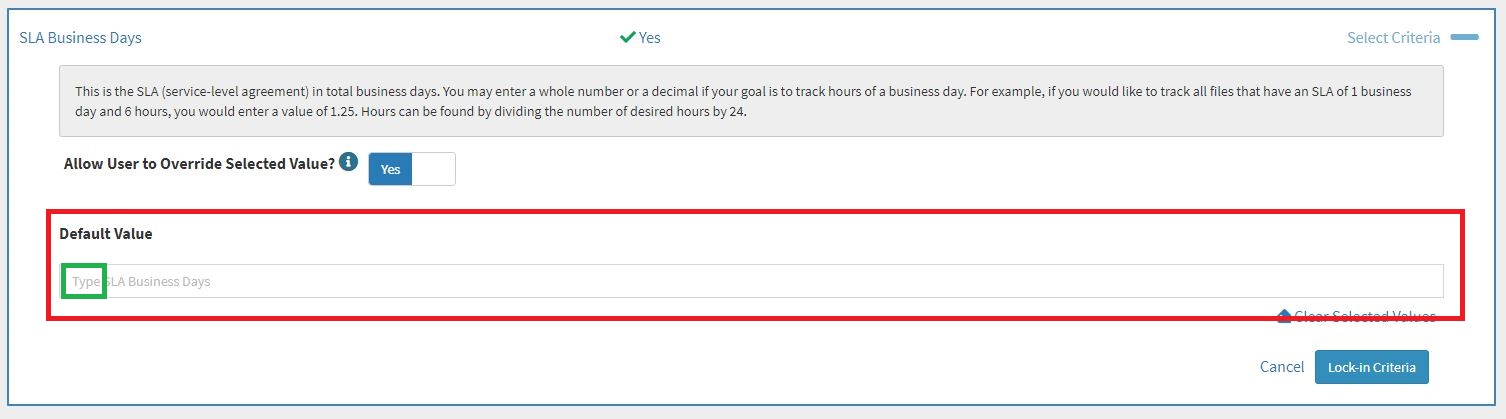
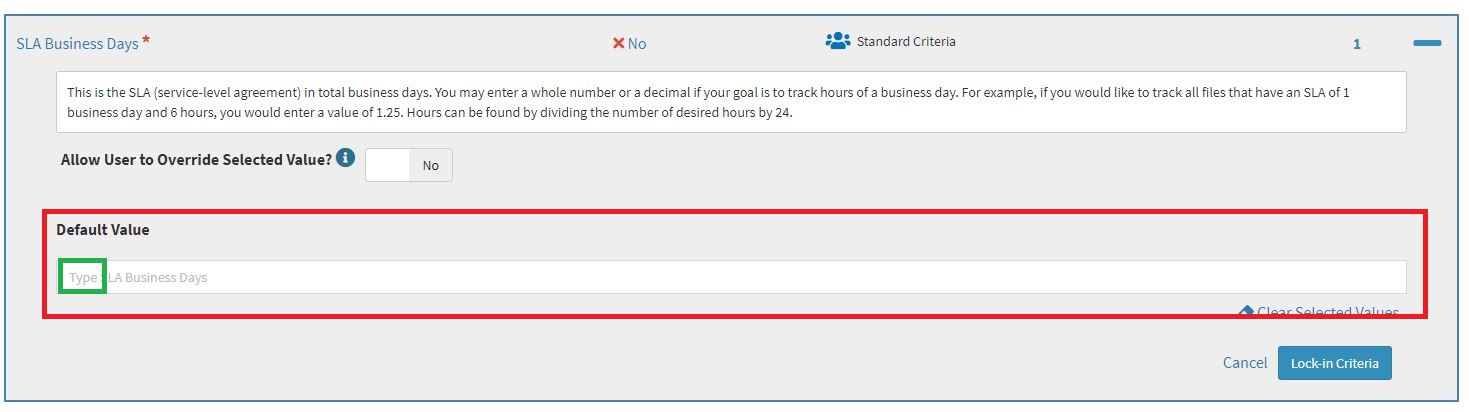
The Text Field Example image listed below will show you what the Text Field selection option in the Default Value section of the Expanded Standard Criteria will look like. The text Type … will appear in the Text Field input field, which will inform you that the criteria is a Text Field.
Text Field Example
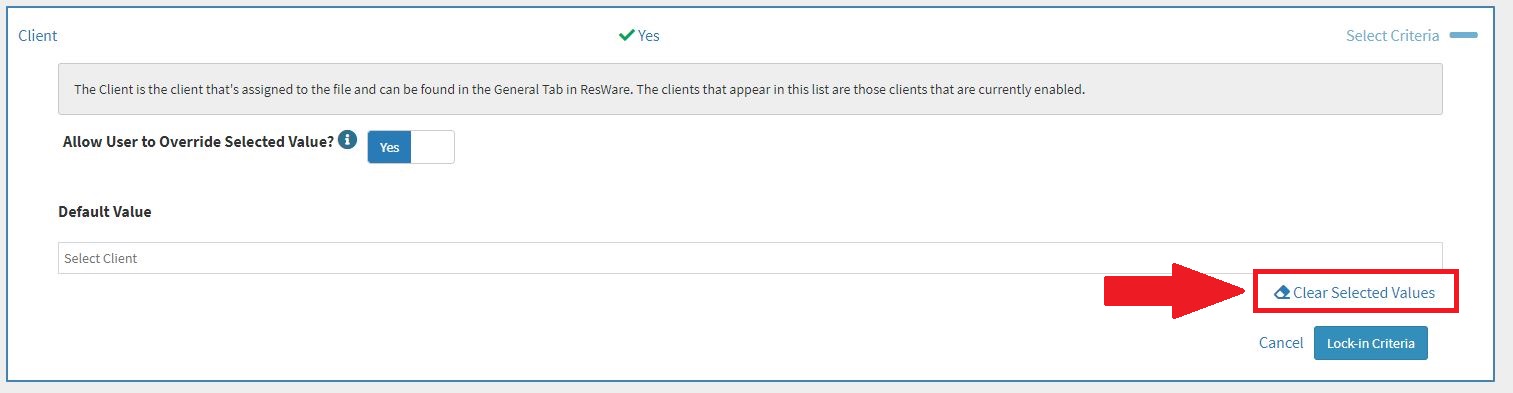
If you would like to remove your default criteria selection for a Standard Criteria, you can click the Clear Selected Values link that at the bottom right of the Default Value section of the Expanded Standard Criteria. Clicking this link will remove ALL default criteria values that are assigned to the Standard Criteria. The Clear Selected Values Example image listed below will show you what the Clear Selected Values link will look the Expanded Standard Criteria will look like.
Clear Selected Values Example
Allowing the Assigned User to Override the Selected Value
The access of each Standard Criteria can be found in the Allow User to Override column. If the value is Yes, the assigned user will have the ability to override and change the selected default value(s). If the value is No, the assigned user will NOT have the ability to override and change the selected default value(s).
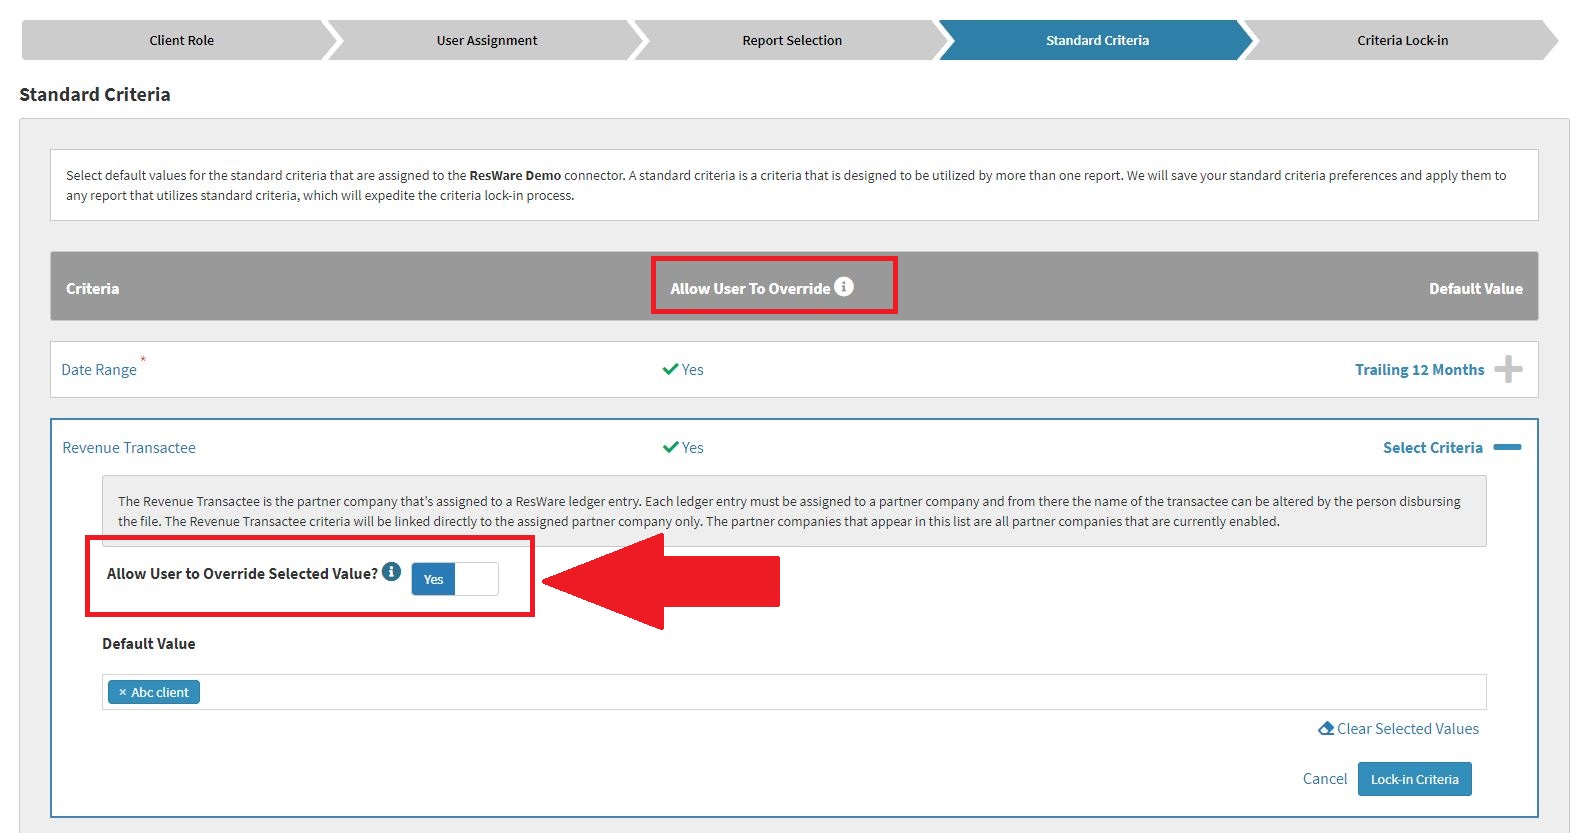
You can change this setting by Expanding the Standard Criteria and toggling the Allow User to Override Selected Value? switch value. The Allow User to Override Default Standard Criteria Values Example image listed below will show you what the Allow User to Override Selected Value? switch will look like when a user WILL have the ability to override the selected default value(s).
Allow User to Override Default Standard Criteria Values Example
The Do NOT Allow User to Override the Default Standard Criteria Values Example image listed below will show you what the Allow User to Override Selected Value? switch will look like when a user will NOT have the ability to override the selected default value(s).
Do NOT Allow User to Override the Default Standard Criteria Values Example
How to Review Selected Default Standard Criteria Values
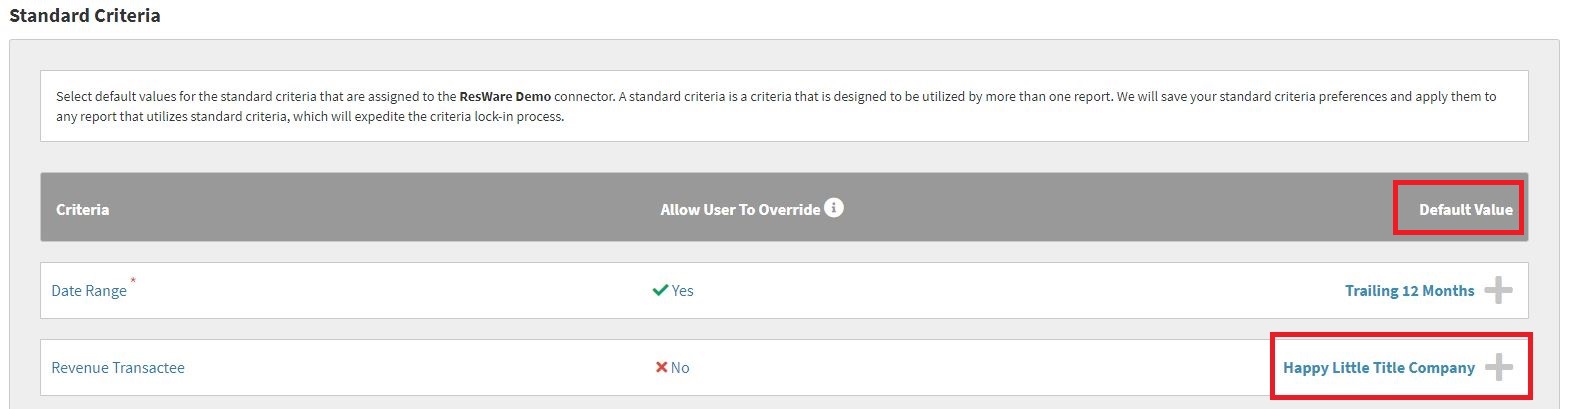
The Default Value assigned to each Standard Criteria can be found in the Default Value column. If one default value is selected, the name of the default value will appear in the Default Value column. The Single Default Standard Criteria Values Example image listed below will show you what it will look like when ONE default value is selected for a Standard Criteria.
Single Default Standard Criteria Values Example
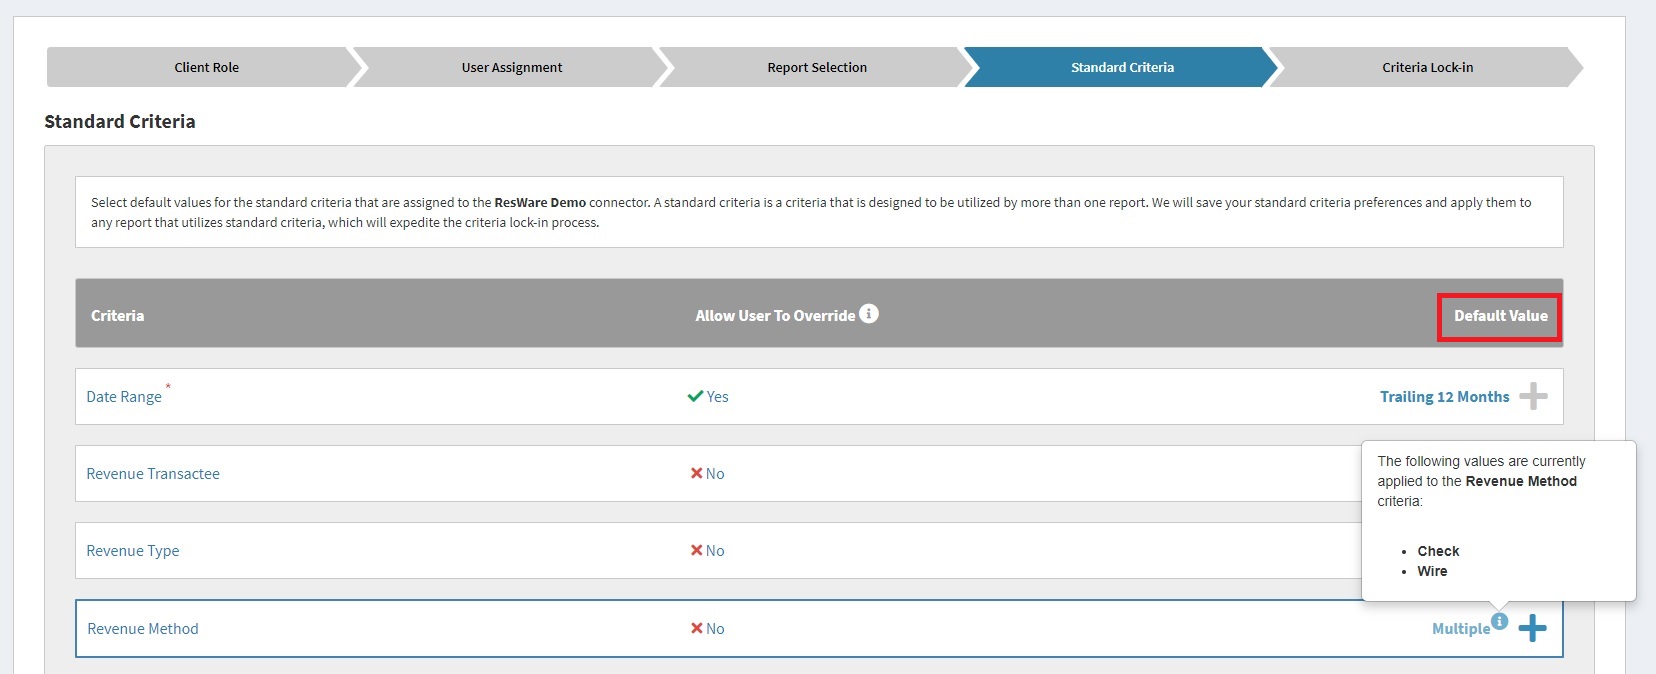
If multiple default values are selected, the text Multiple will appear in the Default Value column. You can hover over the Info icon that appears to the right of the Multiple text to see each default value that’s currently selected for the Standard Criteria. The Show Multiple Default Standard Criteria Values Example image listed below will show you how to view default standard criteria values if Multiple default criteria values are selected for a Standard Criteria.
Show Multiple Default Standard Criteria Values Example
If NO default values are selected, the text Select Criteria will appear in the Default Value column. The No Default Standard Criteria Values Example image listed below will show you what it will look like when NO default criteria values have been selected for a Standard Criteria.
No Default Standard Criteria Values Example

Locking-in Default Standard Criteria Values
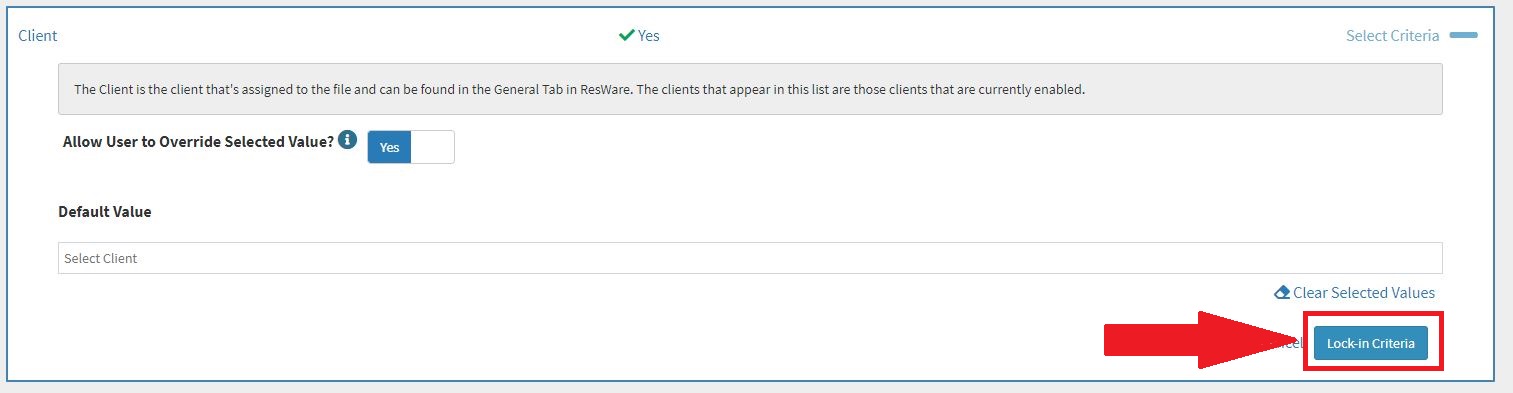
After you’ve Selected Your Default Standard Criteria Values and Confirmed if a user Can Override the Selected Value, you’ll need to Lock-in your selection. To do this, you’ll need to click the Lock-in Criteria button that appears in the bottom right corner of the Expanded Standard Criteria. The Locking-in Default Standard Criteria Values Example image listed below will show you what the Lock-in Criteria button will look in the Expanded Standard Criteria.
Locking-in Default Standard Criteria Values Example
Required Standard Criteria
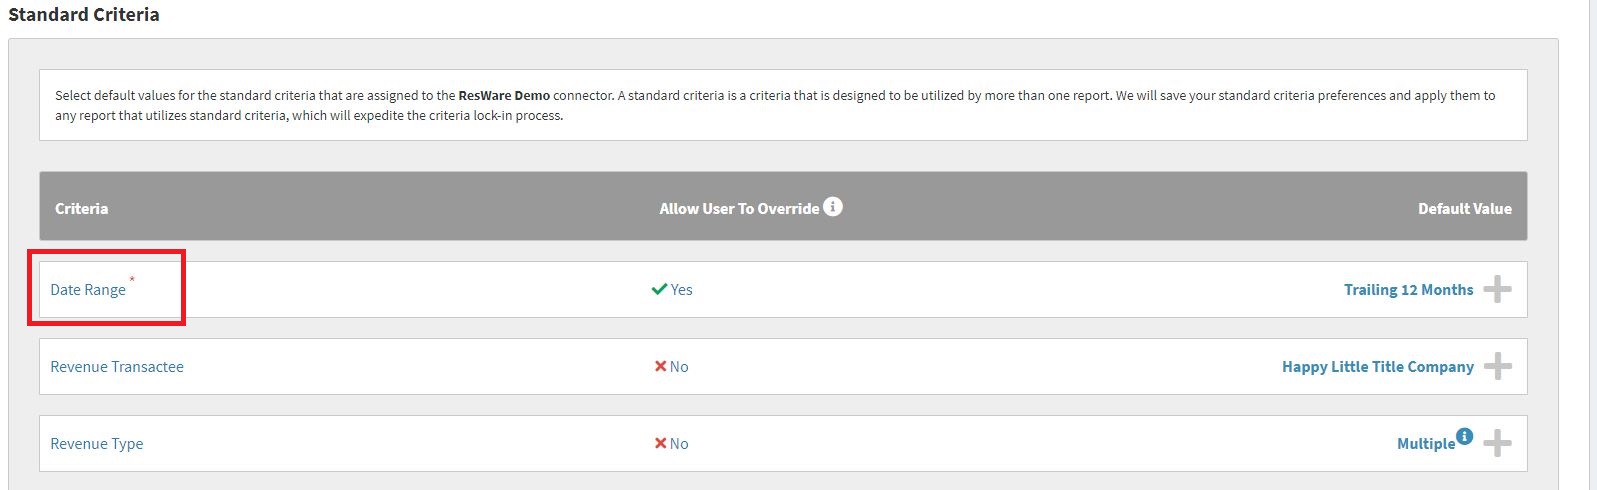
When a Red asterisk appears to the right of the Standard Criteria name, it indicates a default value is required to create your new Access Role and you MUST select a default value for that Standard Criteria. The Required Standard Criteria Example image listed below will show you what Required Standard Criteria will look like.
Required Standard Criteria Example
Reports from Multiple Connectors Assigned the Access Role
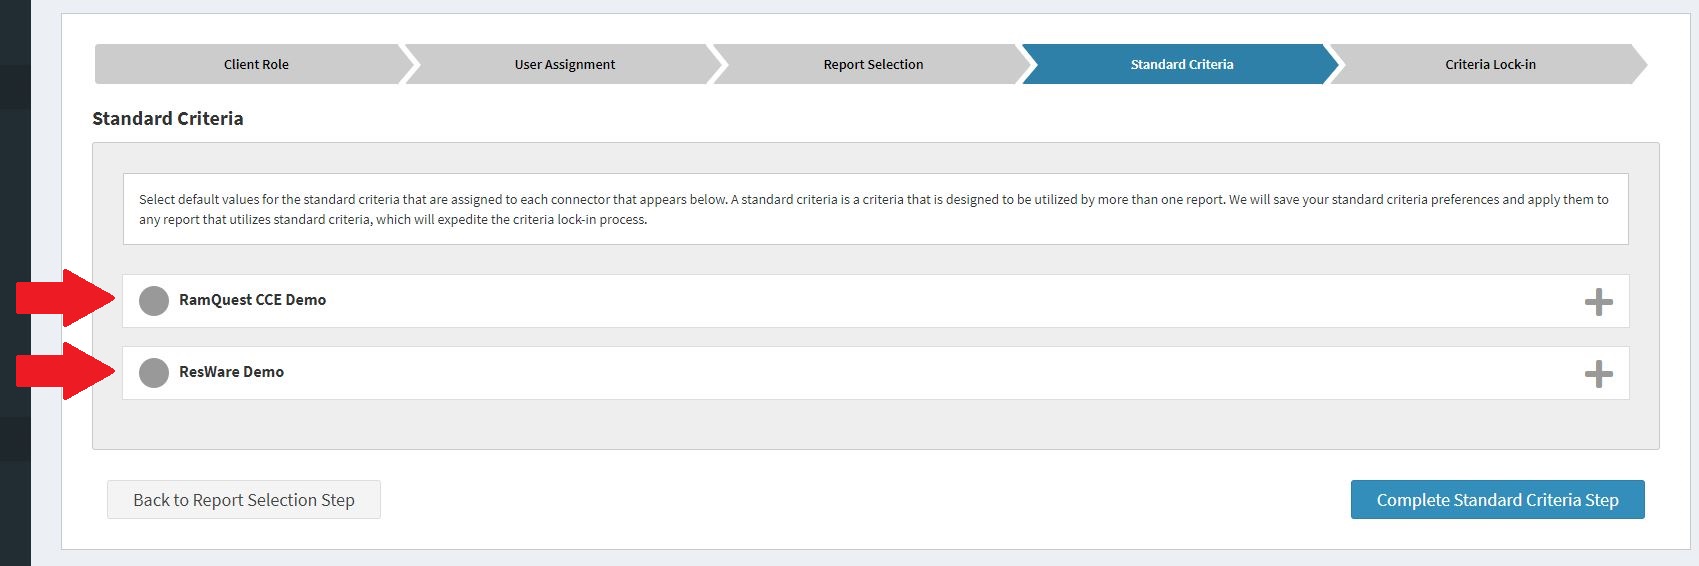
If you Assigned Reports in the Report Selection Step that are assigned to Multiple Connectors to your new Access Role, you’ll need to Lock-in Default Standard Criteria Values for each Connector that’s assigned to the reports you Selected in the Report Selection Step. The Reports from Multiple Connectors Assigned the Access Role Example image listed below will show you what the Standard Criteria step will look like when you’ve Selected Reports in the Report Selection Step that are assigned to Multiple Connectors.
Reports from Multiple Connectors Assigned the Access Role Example
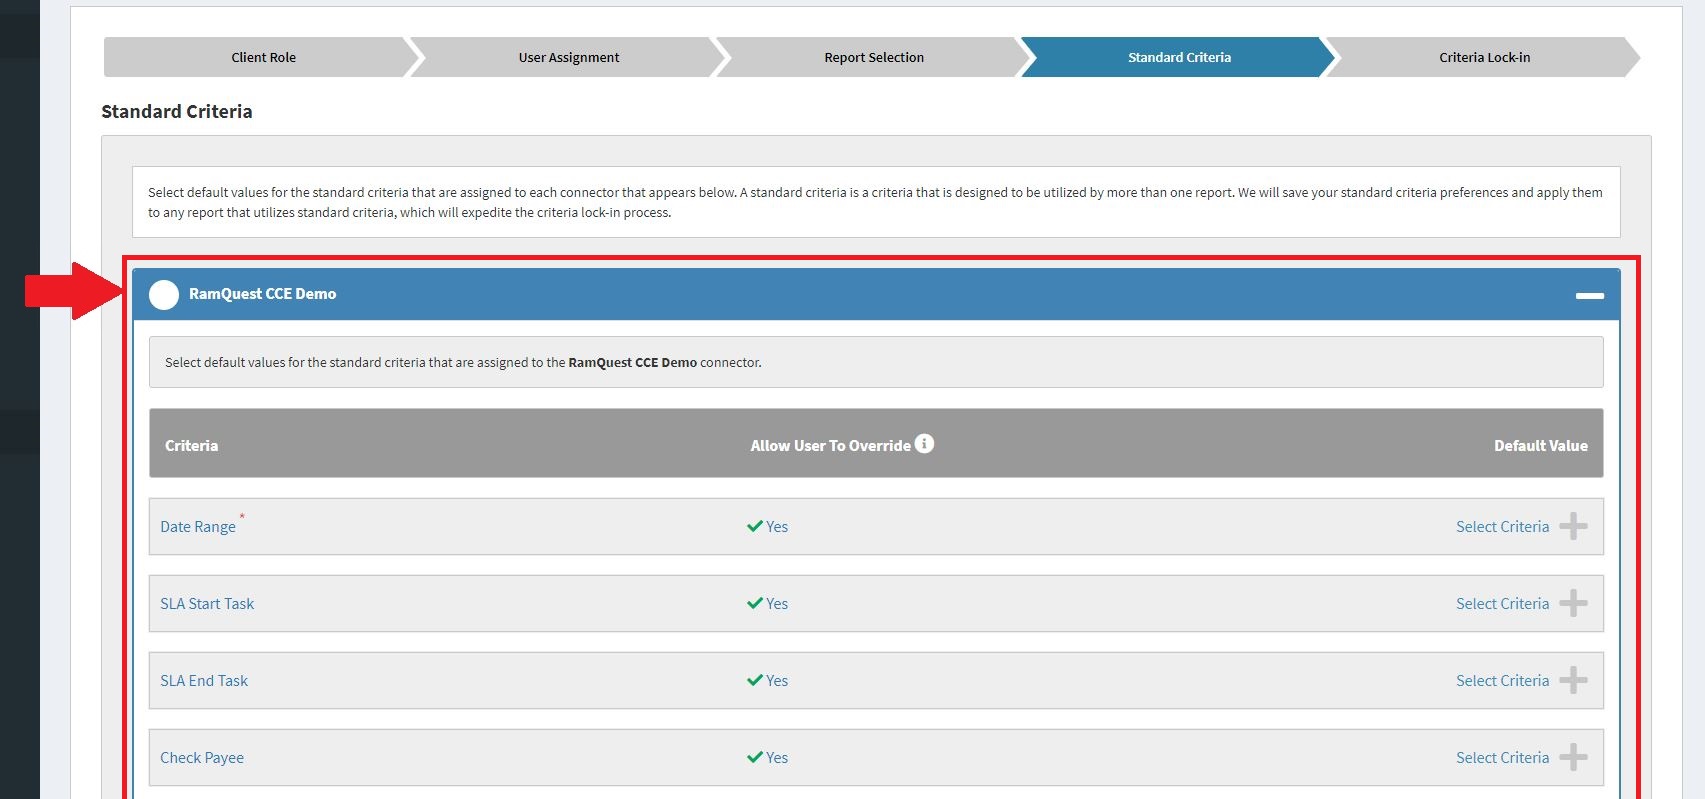
To Select Default Standard Criteria Values for each connector, you’ll need to click the Plus button that appears to the right of each box that displays the name of the Connector that’s assigned to the reports that are currently Assigned to the Access Role. The Expanded Connector Standard Criteria Default Values Example image listed below will show you what an expanded connector will look like after you have clicked the Plus button for a connector.
Expanded Connector Standard Criteria Default Values Example
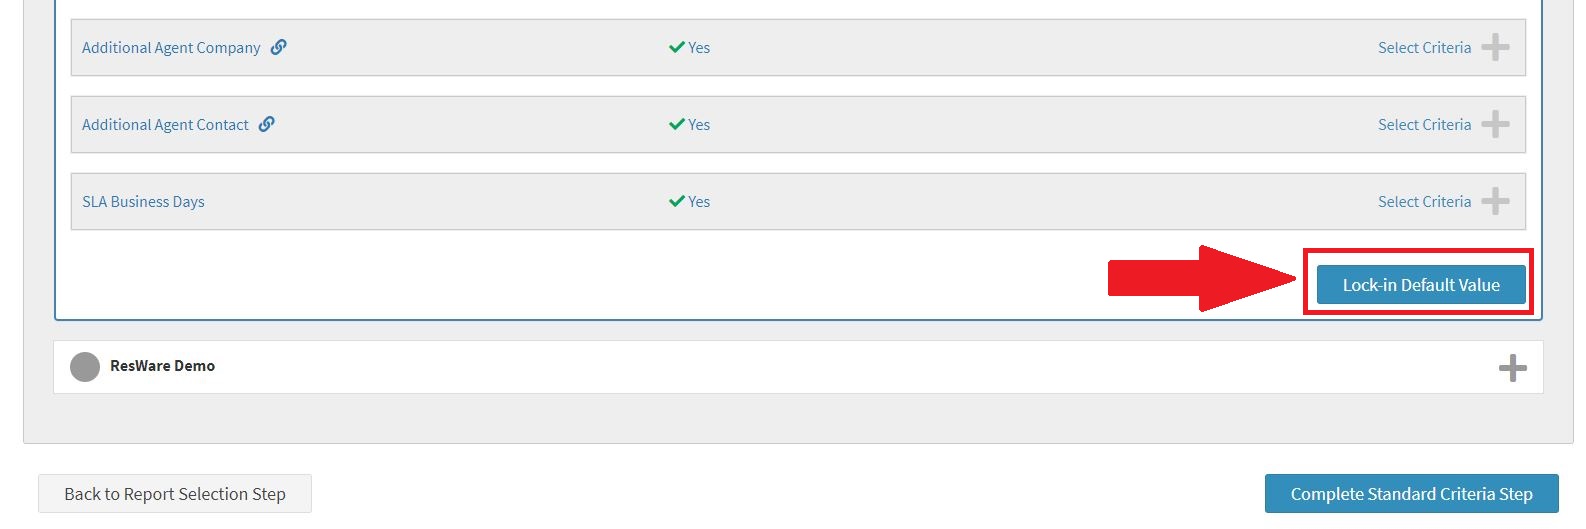
After you’ve Selected Your Default Standard Criteria Values and Confirmed if a user Can Override the Selected Value for each connector standard criteria, you’ll need to Lock-in your selections for the Expanded Connector. To do this, you’ll need to click the Lock-in Criteria button that appears in the bottom right corner of the Expanded Connector. The Lock-in Connector Standard Criteria Default Values Example image listed below will show you what the Lock-in Criteria button will look like in the Expanded Connector.
Lock-in Connector Standard Criteria Default Values Example
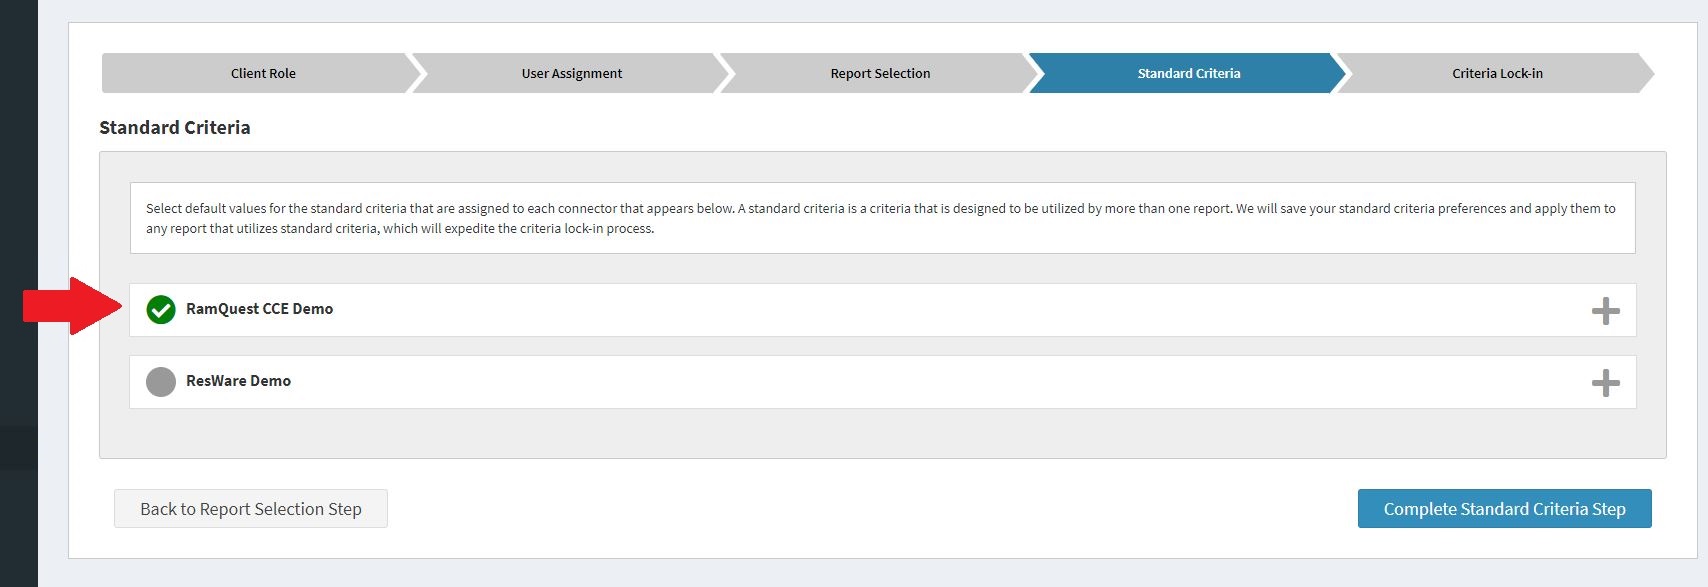
Once you’ve Locked-in Standard Criteria Default Values for a Connector a Green Checkmark will appear to the left of the Connector signifying the review and lock-in process has been completed for the Connector. The Completed Connector Standard Criteria Default Values Example image listed below will show you what a Connector Standard Criteria will look like once it’s been Completed.
Completed Connector Standard Criteria Default Values Example
You MUST Select Default Standard Criteria Values for each Connector BEFORE you can Complete the Standard Criteria Step.
Complete the Standard Criteria Step
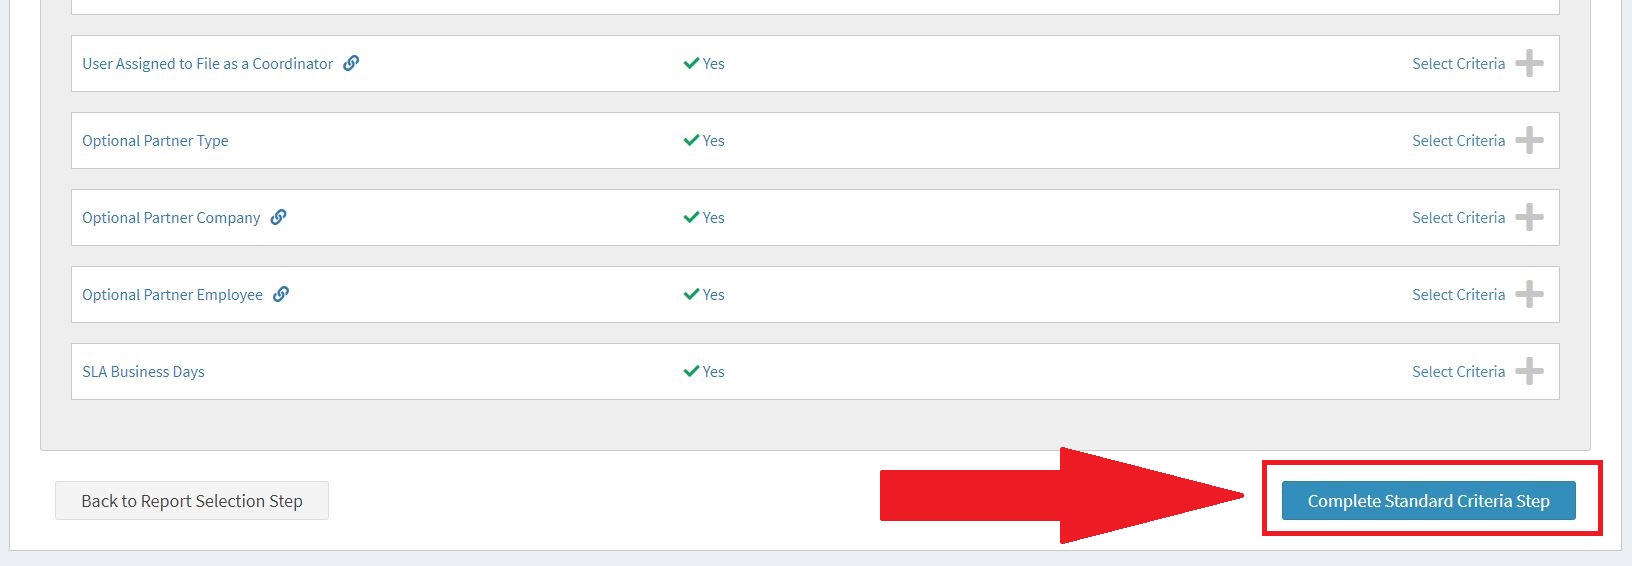
After Selecting the Correct Default Standard Criteria Values and Confirming if a user Can Override the Selected Value for each Standard Criteria, click the Complete the Standard Criteria Step button to move on to the Next Step of the Access Role creation process. The Complete Standard Criteria Step Example image listed below will show you what the Complete the Standard Criteria Step button will look like.
Complete the Standard Criteria Step Example
Required Standard Criteria Warning Message
If you attempt to Complete the Standard Criteria Step without selecting a default value for a Required Standard Criteria, you’ll receive a warning message prompting you to select default values for any Required Standard Criteria before continuing. The Required Standard Criteria Warning Message Example image listed below will show you what the Required Standard Criteria Warning Message will look like.
Required Standard Criteria Warning Message Example
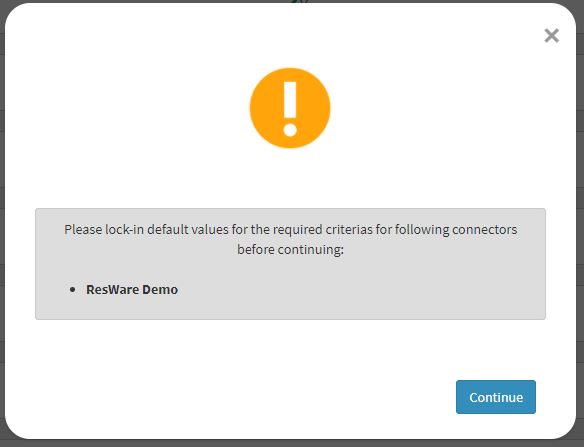
If you receive the Required Standard Criteria Warning Message, you’ll need to ensure a default value is selected for each Required Standard Criteria before Completing the Standard Criteria Step.
Criteria Lock-in Step
The Criteria Lock-in Step will allow you to select default criteria values for each Report that’s assigned to the new Access Role you’re creating.
What are Common Sets?
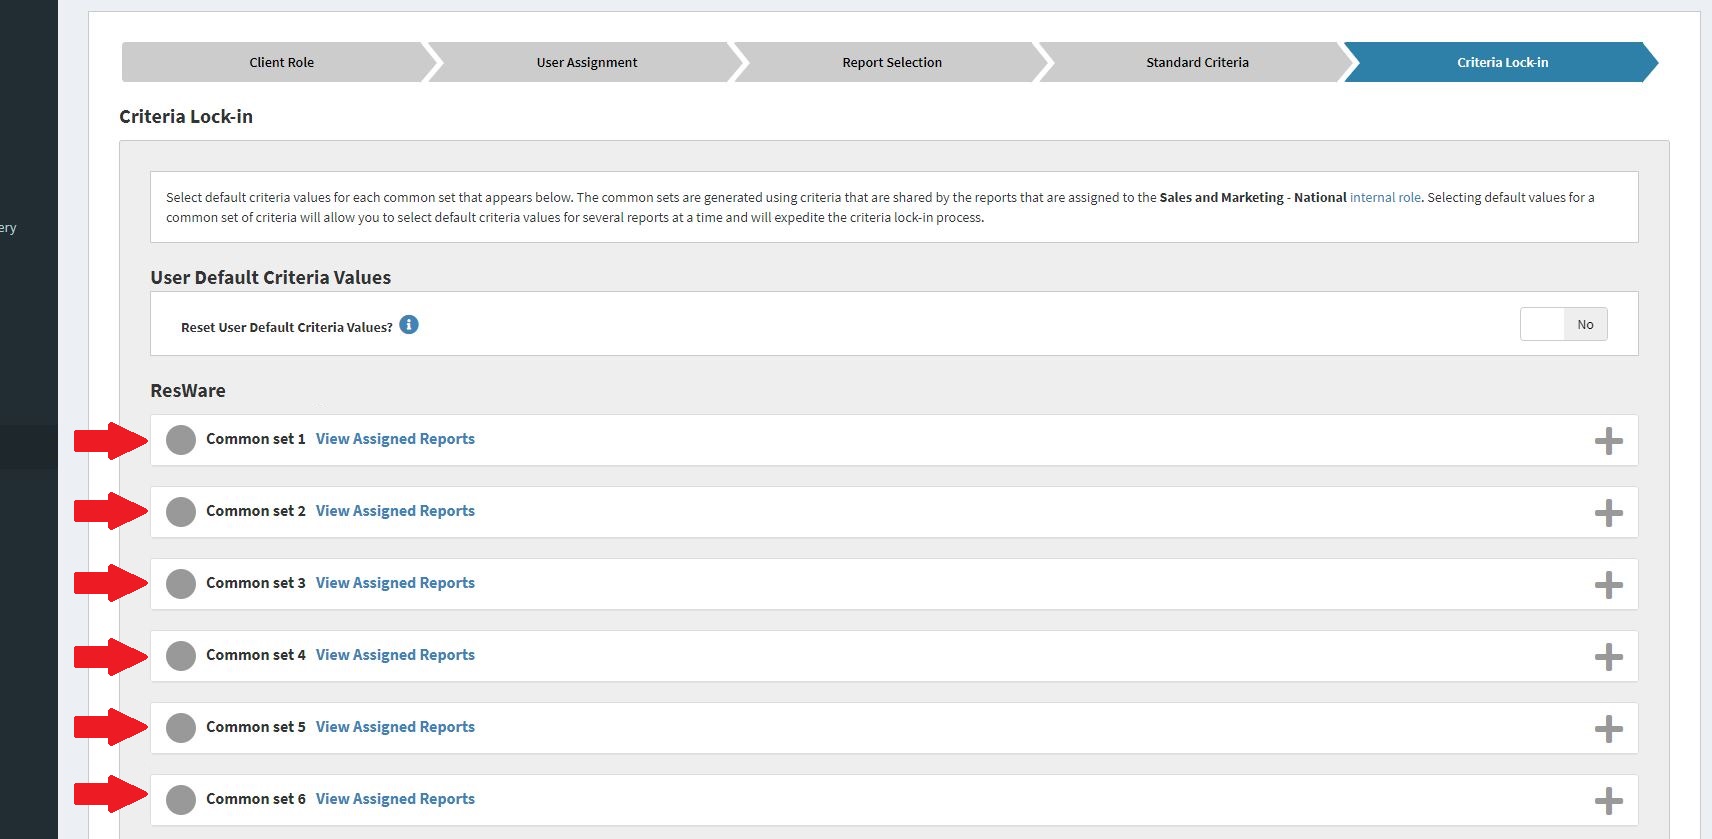
To make the process of selecting default criteria values for each report that’s assigned to your new Access Role easier to manage and less time consuming to complete, we compare the criteria that are assigned to each report and group the reports that share the exact same criteria into a Common Set of Criteria. This will allow you to select default criteria values for Each Report that’s assigned to a Common Set of Criteria. The What are Common Sets Example image listed below will show you what Common Sets will look like in the Criteria Lock-in Step.
What are Common Sets Example
How to Expand Common Sets
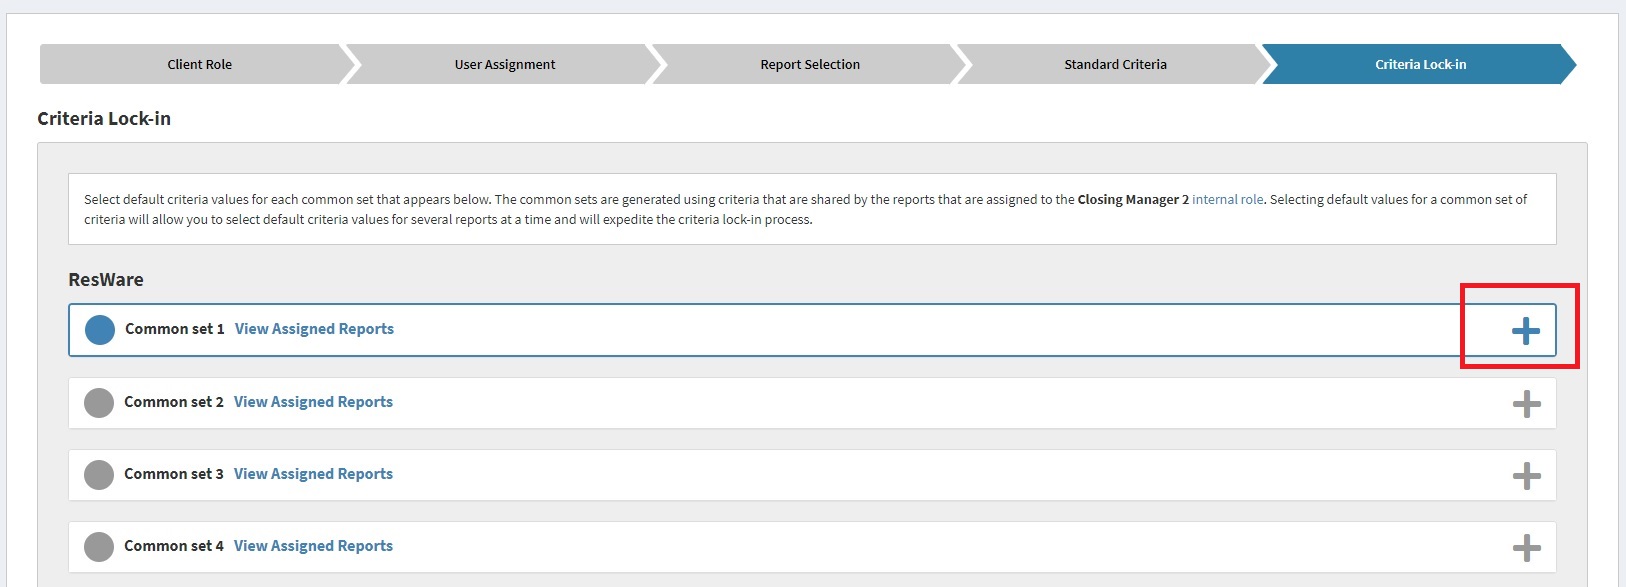
You must click the Plus icon on the Common Set to Expand it. Once expanded, you can view the criteria that’s assigned to each report in the Common Set. When you hover over a Common Set the border and icons will turn to Blue. The How to Expand Common Sets Example image listed below will show you what a Common Set will look like when you hover over it.
How to Expanded Common Sets Example
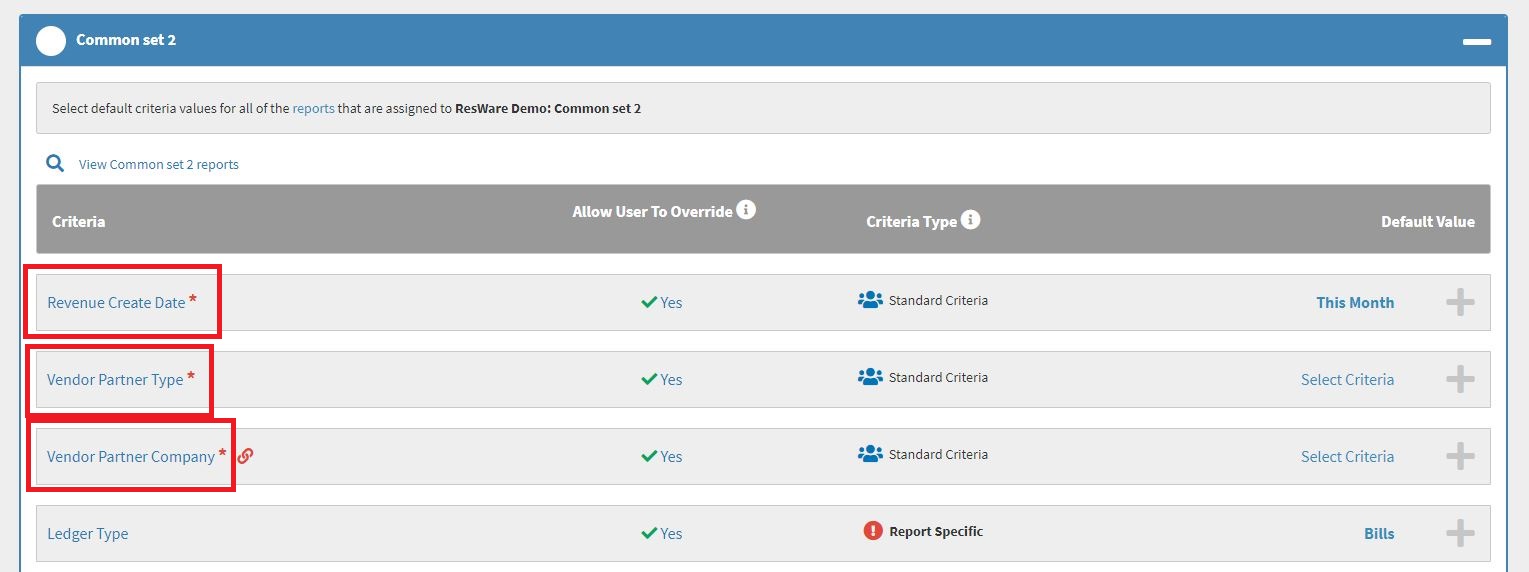
After you click on the Common Set to Expand it, you’ll see the Criteria, User Access Level, Criteria Type, and Default Value assigned to each criteria in the Common Set. The Expand Common Set Example image listed below will show you what a Common Set will look like when it has been expanded.
Expanded Common Sets Example

How to View Common Set Report Assignment
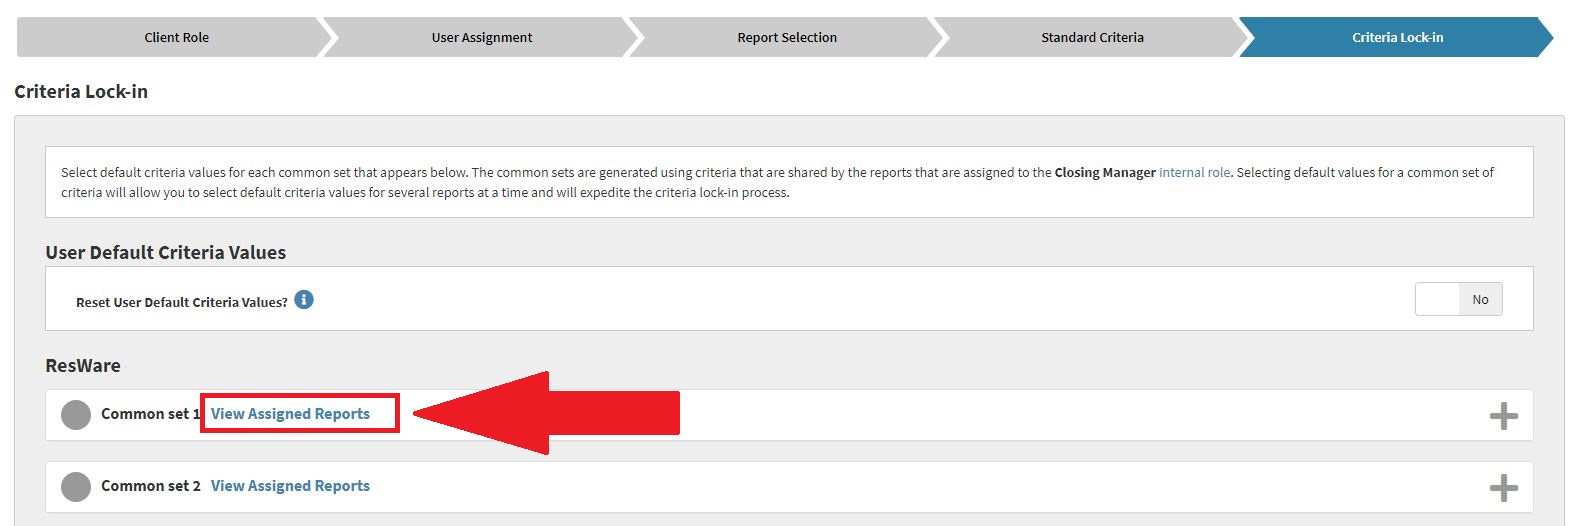
When the Criteria Lock-in Step loads you’ll be presented with all the Common Sets of Criteria that were generated. You can view the reports that are assigned to each Common Set by clicking the View Assigned Reports link when a Common Set is NOT Expanded or by clicking the View Common Set ## Reports link when a Common Set IS Expanded.
The View Non-Expanded Common Set Reports Example image listed below will show you what the View Assigned Reports link will look like when a Common Set is NOT Expanded.
View Non-Expanded Common Set Reports Example
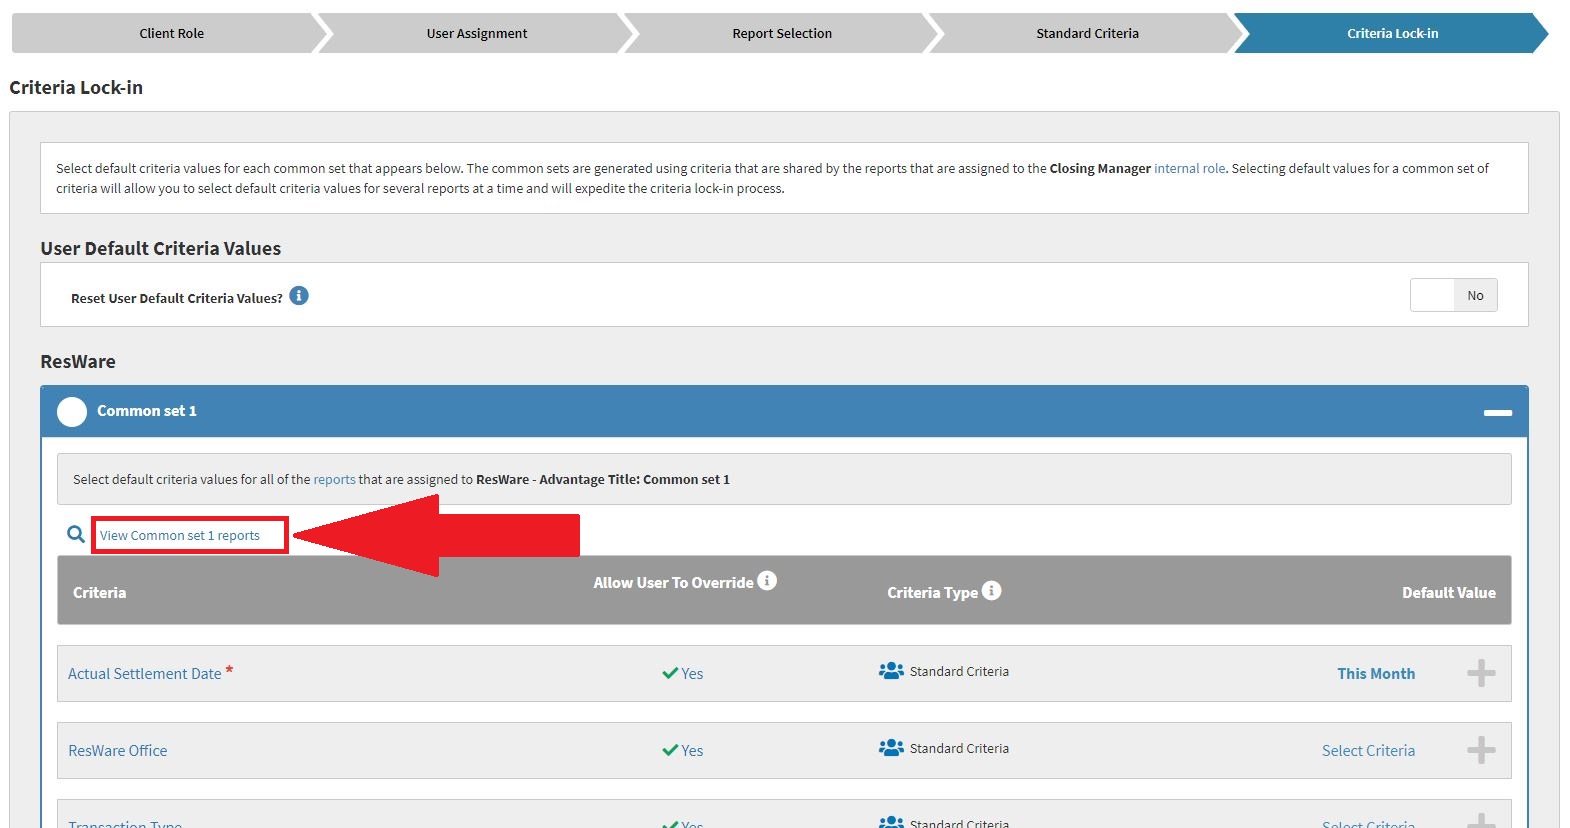
The View Expanded Common Set Reports Example image listed below will show you what the View Common Set ## Reports in will look like when a Common Set IS Expanded.
View Expanded Common Set Reports Example
Understanding Common Set Criteria Types
There are two types of criteria that can be assigned to a Common Set. The Common Set criteria will either be a Standard Criteria or a Report Specific Criteria. Standard Criteria and Report Specific Criteria are further defined below:
Standard Criteria
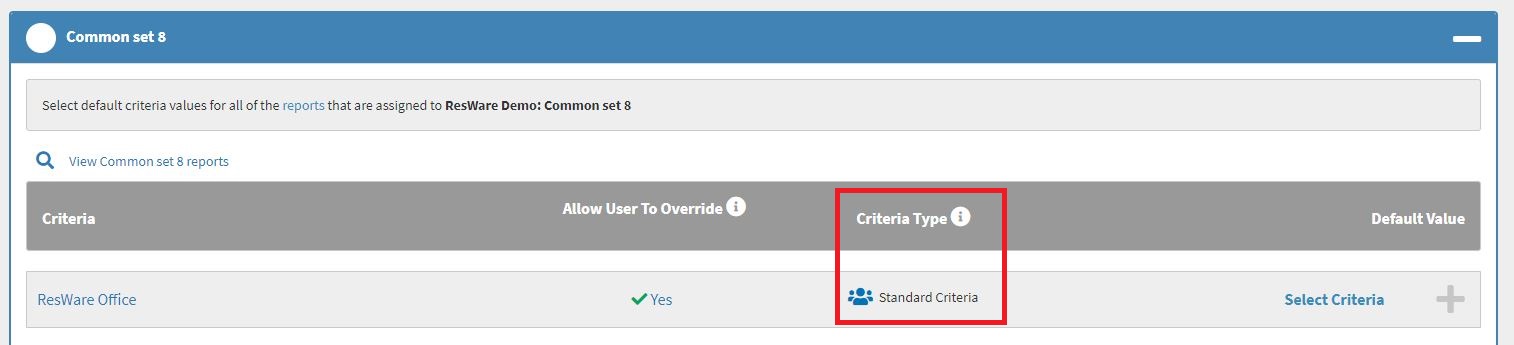
Standard Criteria are criteria that are designed to be used by multiple reports and are configured globally in the Ops Insights application. When you select default Standard Criteria values in the Standard Criteria Step your selections will be carried over to each Common Set IF the Common Set criteria has a Criteria Type of Standard Criteria. The Standard Criteria Example image listed below will show you what a Standard Criteria will look like in an Expand Common Sets.
Standard Criteria Example
Report Specific Criteria
Report Specific Criteria are designed to be used by only one Ops Insights report and are configured in the report itself. Because Report Specific criteria are managed on an individual report level, default criteria values for Report Specific criteria must be selected for each Common Set they appear in.
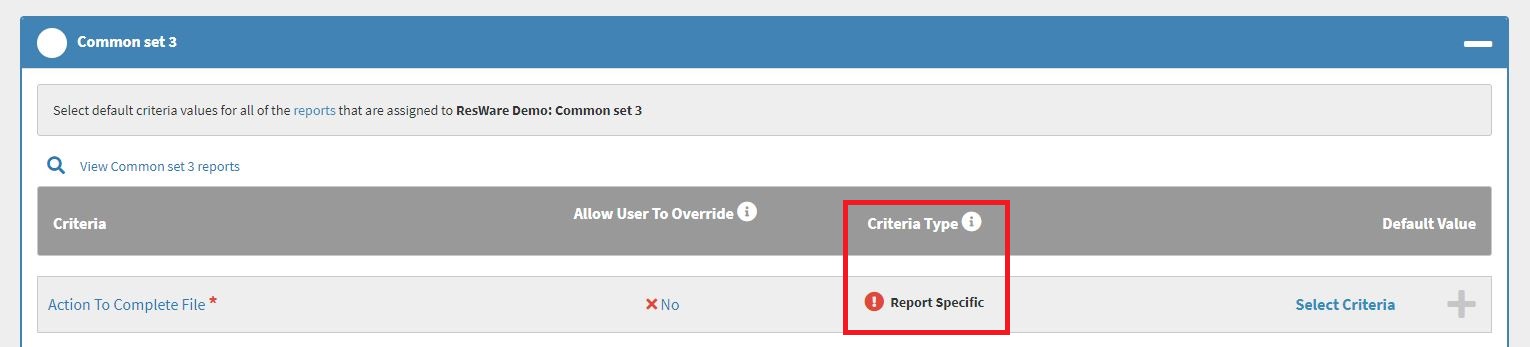
Default Standard Criteria values selected in the Standard Criteria Step will NOT be carried over to Report Specific Criteria in the Common Set even if the name of a Report Specific Criteria matches the name of a Standard Criteria. The Report Specific Criteria Example image listed below will show you what a Report Specific Criteria will look like in an Expand Common Set.
Report Specific Criteria Example
Selecting Common Set Default Criteria Values
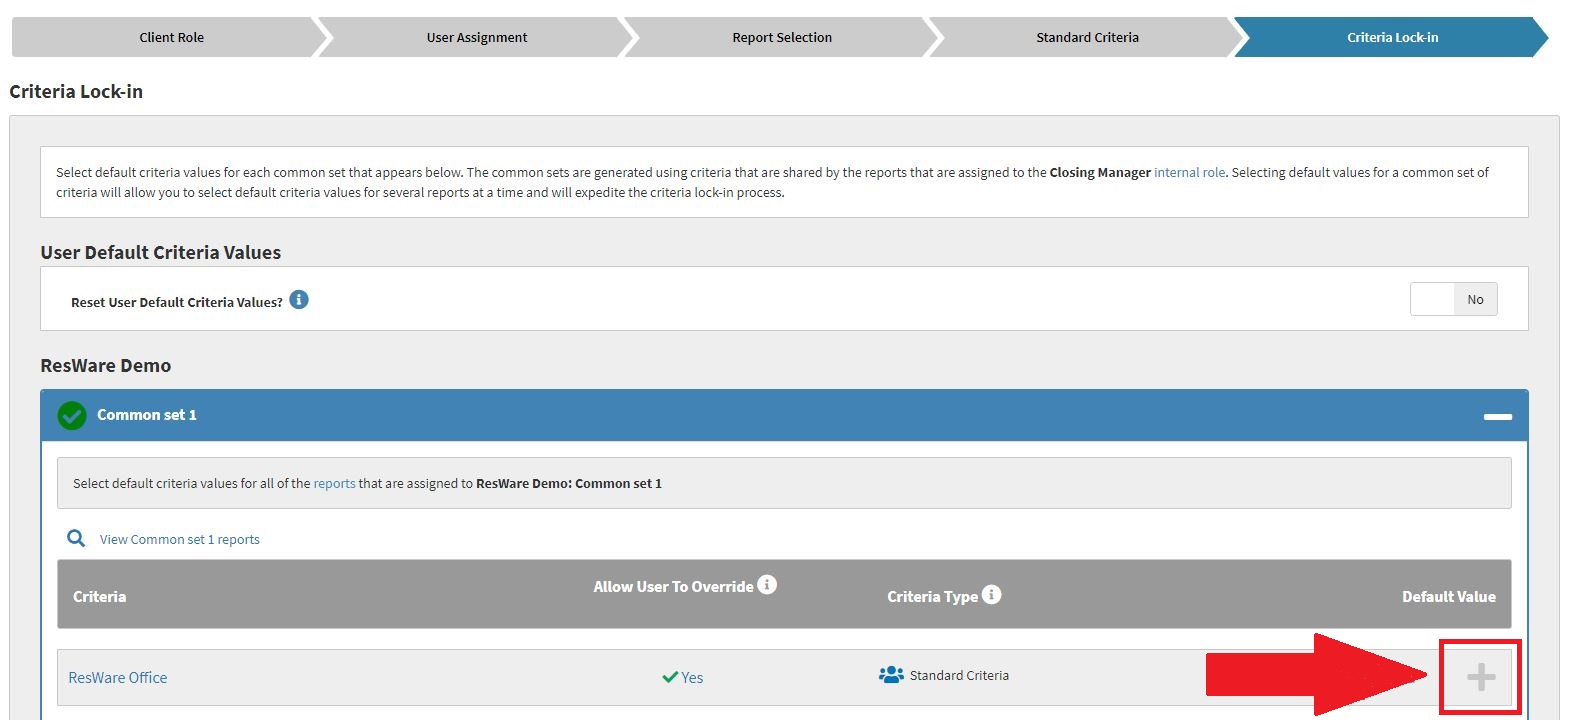
To select default Common Set criteria values, you’ll need to click the Plus icon that appears to the right of each criteria that appears in the Expanded Common Set. The Expanding Common Set Criteria Example image listed below will show you how to Expand a Common Set criteria.
Expanding Common Set Criteria Example
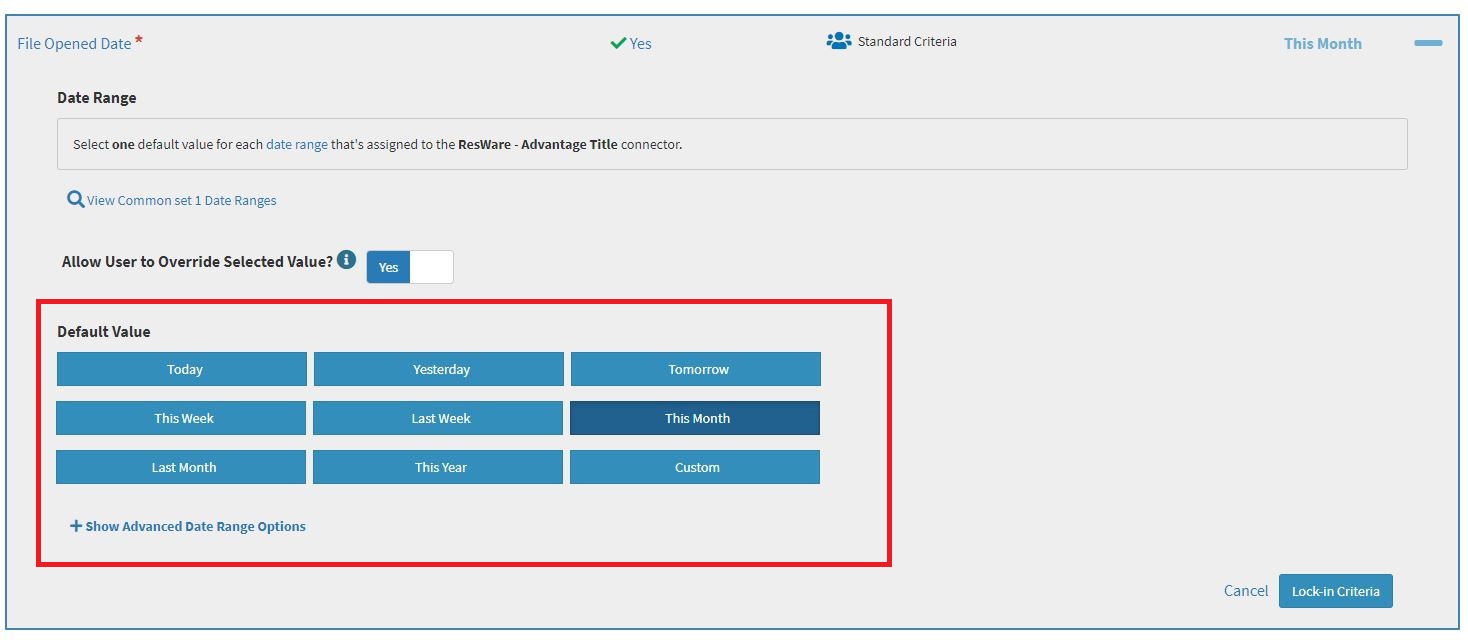
Once the Common Set criteria is Expanded, you’ll need to select/enter a value in the Default Value section of the Expanded criteria. There will be different types of selection options in the Default Value section of the Expanded criteria depending on its type. The Date Range Example image listed below will show you what the Date Range selection options in the Default Value section of the Expanded criteria will look like.
Date Range Example
The Multiple Selection Example image listed below will show you what the Multiple Selection List selection option in the Default Value section of the Expanded criteria will look like. The text Select … will appear in the Multiple Selection List input field, which will inform you that the criteria is a Multiple Selection List.
Multiple Selection Example

The Dropdown List Example image listed below will show you what the Dropdown List selection option in the Default Value section of the Expanded criteria will look like. The text Select … will appear in the Dropdown List input field AND a Down Arrow will appear to the right of the Dropdown List input field, which will inform you that the criteria is a Dropdown List.
Dropdown List Example
The Text Field Example image listed below will show you what the Text Field selection option in the Default Value section of the Expanded criteria will look like. The text Type … will appear in the Text Field input field, which will inform you that the criteria is a Text Field.
Text Field Example
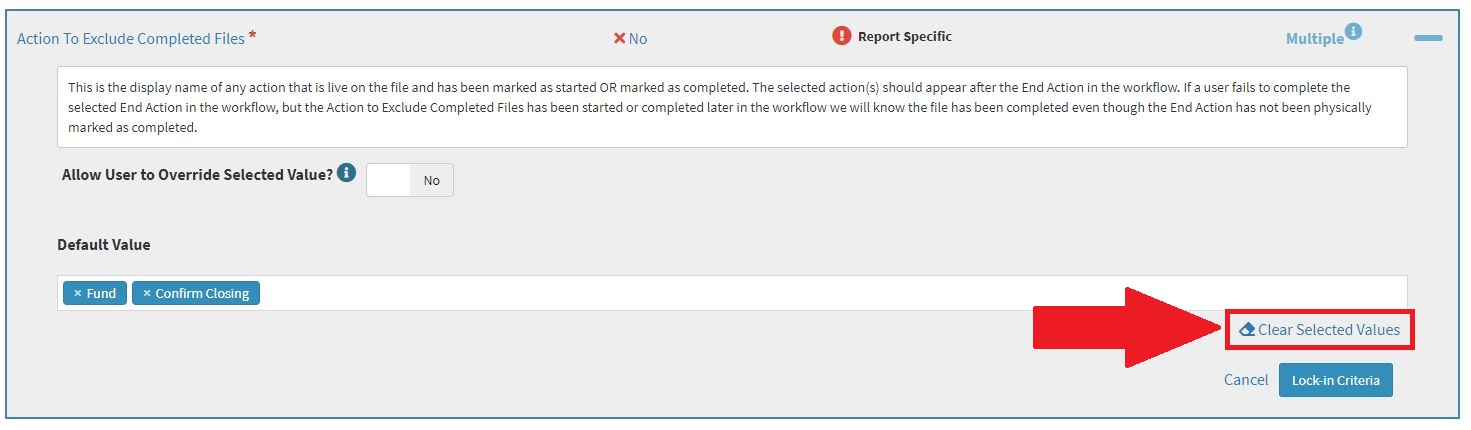
If you would like to remove your default selection for a criteria, you can click the Clear Selected Values link that at the bottom right of the Default Value section of the Expanded criteria. Clicking this link will remove ALL default criteria values that are assigned to the criteria. The Clear Selected Values Example image listed below will show you what the Clear Selected Values link will look the Expanded criteria will look like.
Clear Selected Values Example
Allowing the Assigned User to Override the Selected Common Set Value
The access of each Common Set Criteria can be found in the Allow User to Override column. If the value is Yes, the assigned user will have the ability to override and change the selected default value(s). If the value is No, the assigned user will NOT have the ability to override and change the selected default value(s).
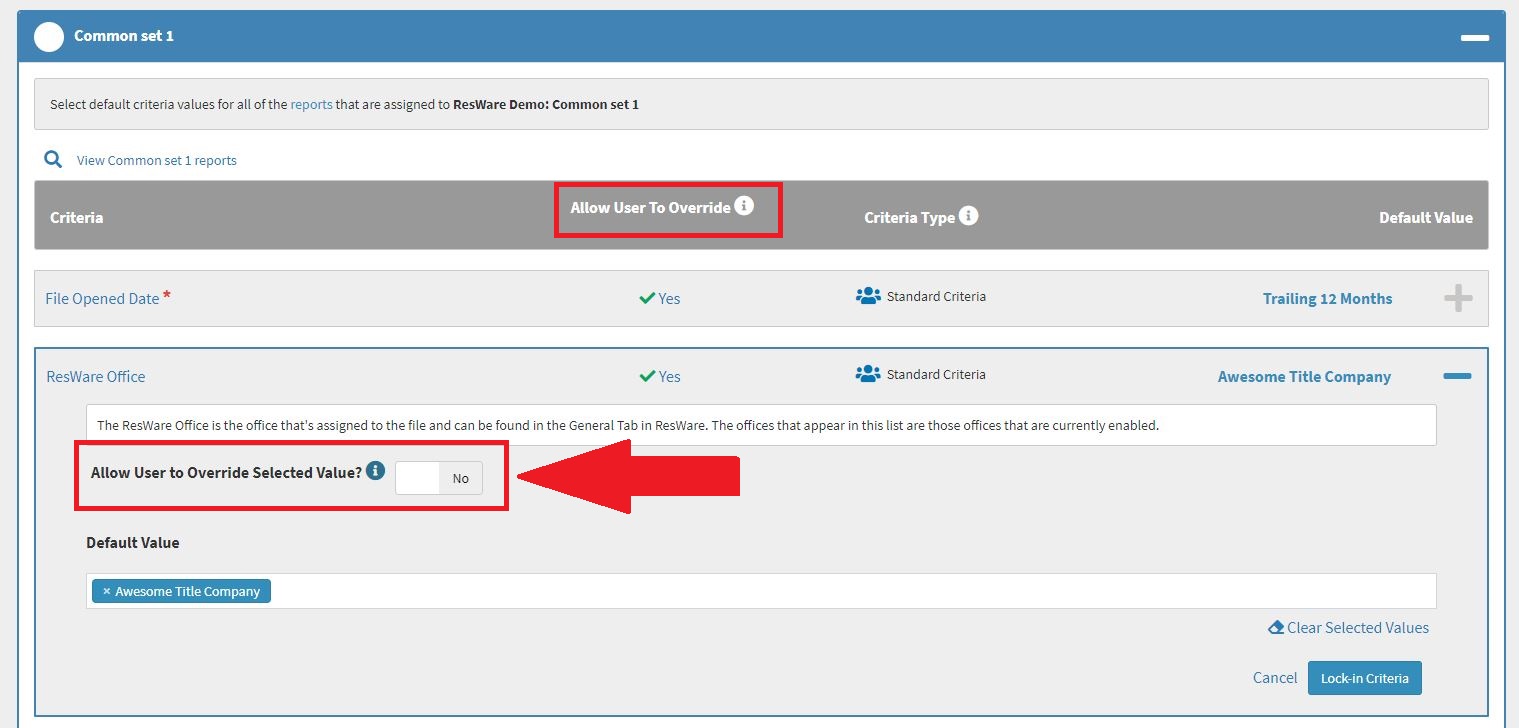
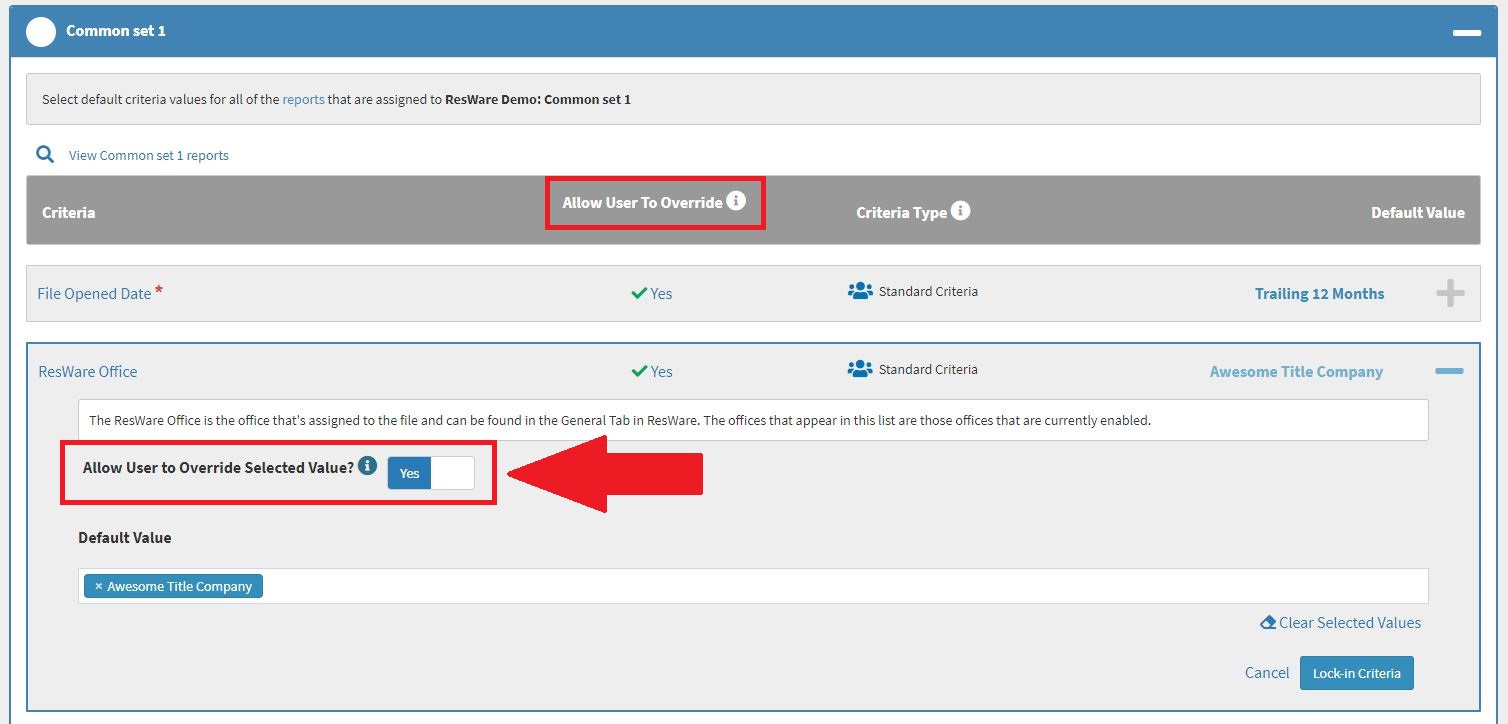
You can change this setting by Expanding a criteria in the Common Set and toggling the Allow User to Override Selected Value? switch value. The Allow User to Override the Selected Common Set Value Example image listed below will show you what the Allow User to Override Selected Value? switch will look like when a user WILL have the ability to override the selected default value(s).
Allow User to Override the Selected Common Set Value Example
The Do NOT Allow User to Override the Selected Common Set Value Example image listed below will show you what the Allow User to Override Selected Value? switch will look like when a user will NOT have the ability to override the selected default value(s).
Do NOT Allow User to Override the Selected Common Set Value Example
Required Common Set Criteria
When a Red asterisk appears to the right of the Common Set criteria, it indicates a default value is required to create your new Access Role and you MUST select a default value for the Common Set criteria. The Required Common Set Criteria Example image listed below will show you what Required Common Set Criteria will look like in an Expand Common Set.
Required Common Set Criteria Example
How to Review Selected Common Set Default Criteria Values
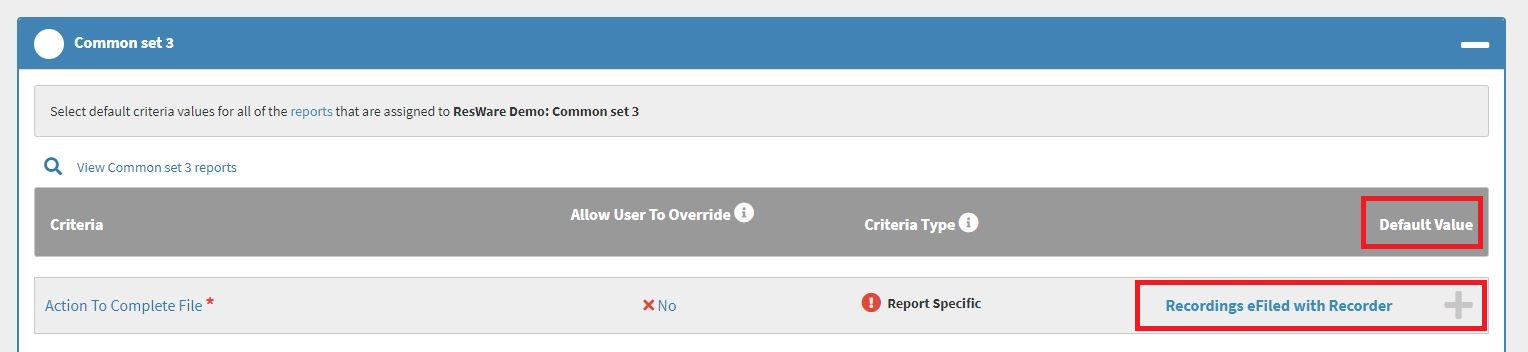
The Default Value assigned to a criteria in a Common Set can be found in the Default Value column on an Expanded Common Set. If one default value is selected, the name of the default value will appear in the Default Value column. The Single Default Common Set Criteria Values Example image listed below will show you what a Common Set criteria will look like when ONE default value is selected.
Single Default Common Set Criteria Values Example
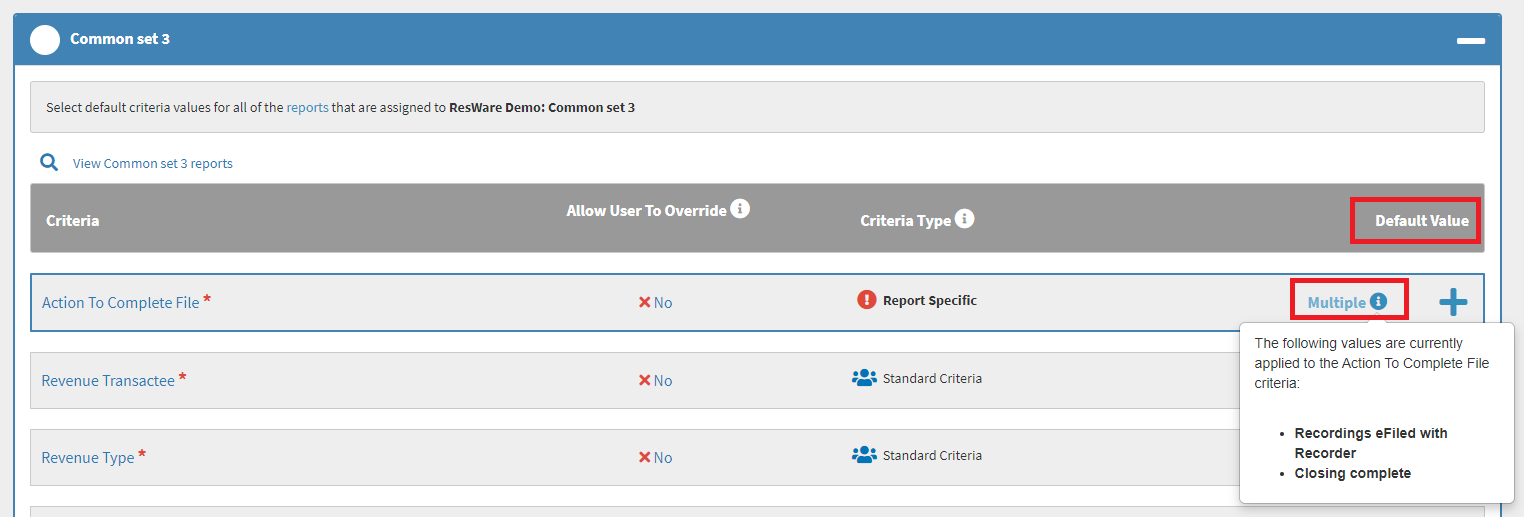
If multiple default values are selected, the text Multiple will appear in the Default Value column. You can hover over the Info icon that appears to the right of the Multiple text to see each default value that’s currently selected for the Common Set criteria. The Show Multiple Default Common Set Criteria Values Example image listed below will show you how to view default Common Set criteria values if Multiple default criteria values are selected for a Common Set criteria.
Show Multiple Default Common Set Criteria Values Example
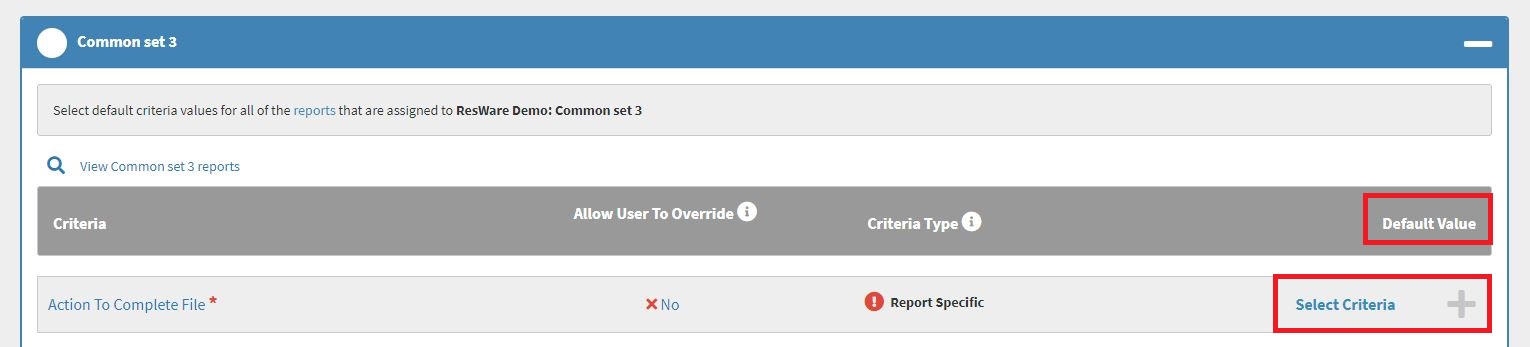
If NO default values are selected, the text Select Criteria will appear in the Default Value column. The No Default Common Set Criteria Values Example image listed below will show you what it will look like when NO default criteria values have been selected for a Common Set criteria.
No Default Standard Criteria Values Example
Lock-in Common Set Default Values
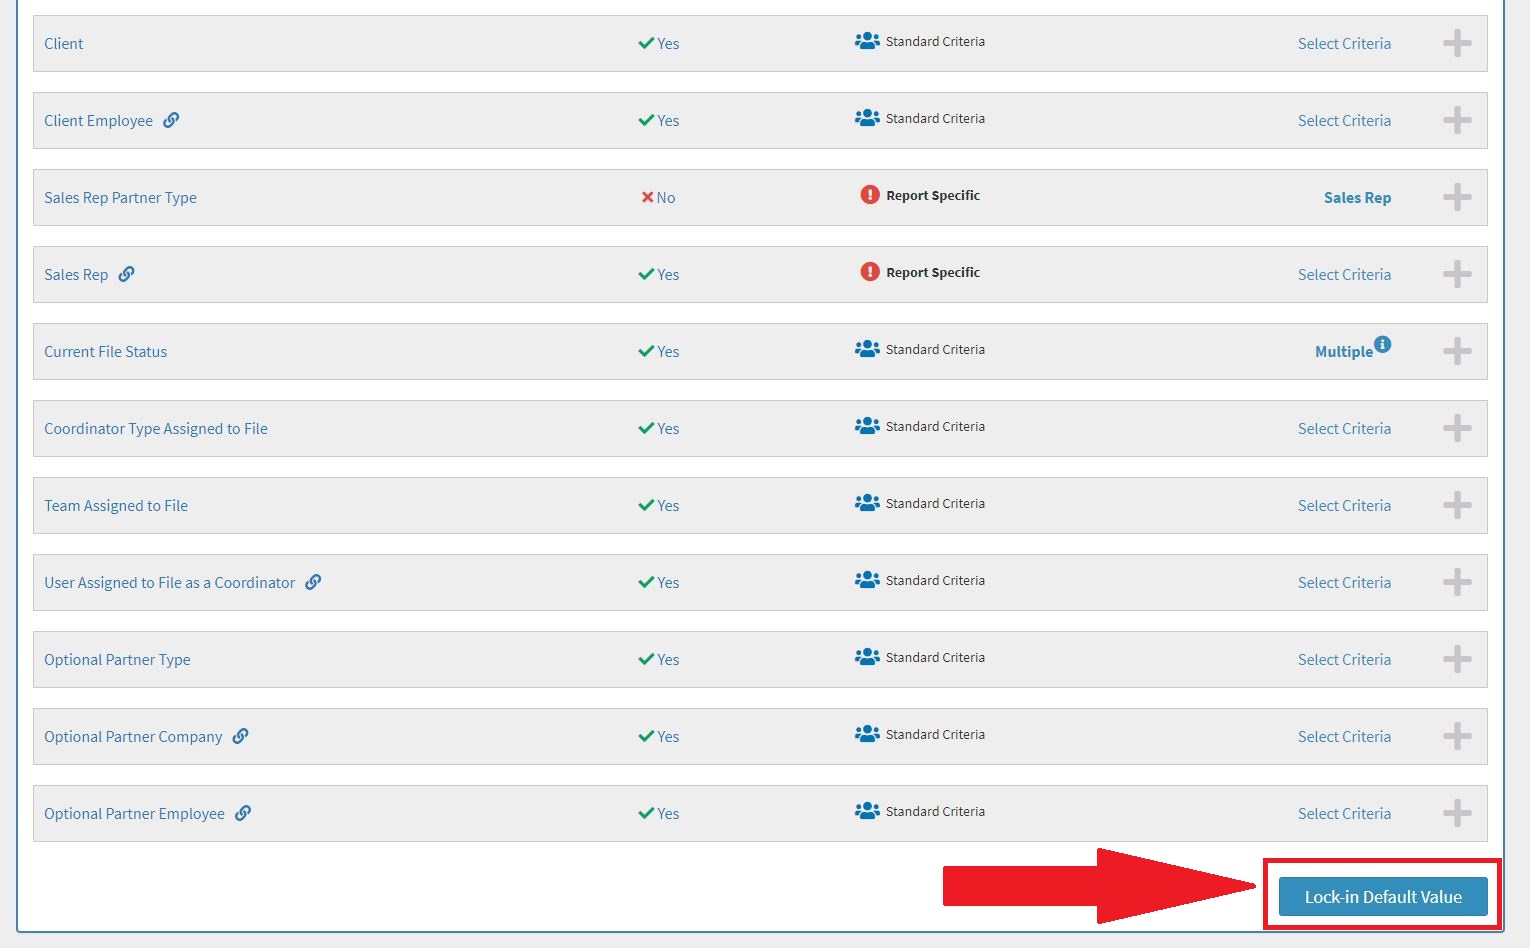
Once you’ve Selected Default Criteria Values and Confirmed if a user Can Override the Selected Value for each criteria in the Common Set, click the Lock-in Default Value button that appears at the bottom of the Expanded Common Set to confirm your selections. The Lock-in Common Set Default Values Example image listed below will show you what the Lockin Default Value button will look like in an Expand Common Set.
Lock-in Common Set Default Values Example
Required Common Set Criteria Warning Message
If you attempt to Lock-in Common Set Default Values without selecting a default value for a Required Common Set Criteria, you’ll receive a warning message prompting you to Select default criteria values for any Required Common Set Criteria before continuing. The Required Common Set Criteria Warning Message Example image listed below will show you what the Required Common Set Criteria Warning Message will look like.
Required Common Set Criteria Warning Message Example
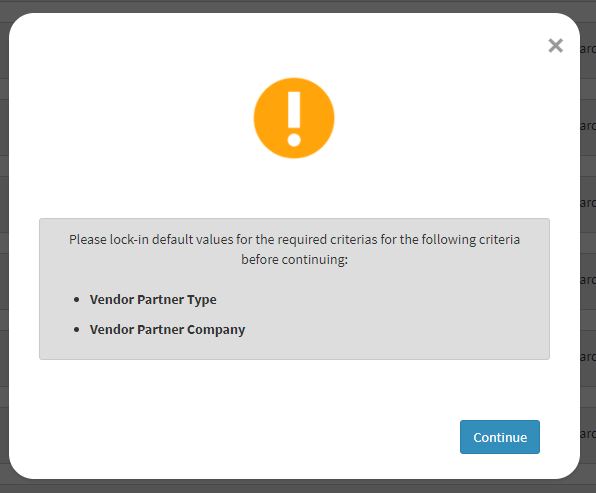
If you receive the Required Common Set Criteria Warning Message, you’ll need to ensure a default value is Selected for each Required Common Set Criteria before Locking-in Common Set Default Values.
Confirm Default Values for each Common Set
You must review and Lock-in Default Criteria Values for each Common Set that’s assigned to the new Access Role you’re creating before you can Complete the Criteria Lock-in Step.
Each time you Complete a Common Set, the Common Set will collapse and the next common set that Needs to be Reviewed and Completed will be Expand. If all the Common Sets have been Completed, you’re ready to Complete the Criteria Lock-in Step.
Completed Common Set
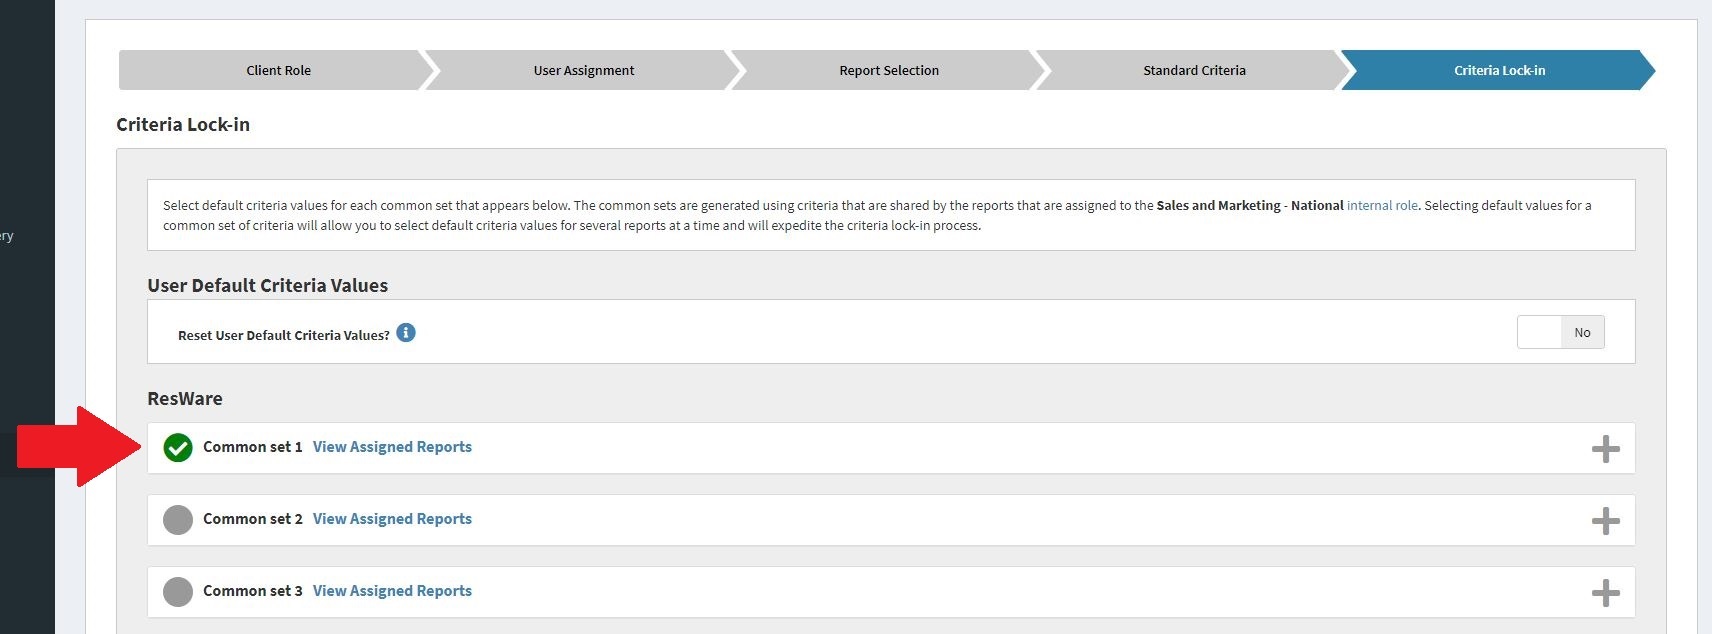
Once you’ve Locked-in Default Criteria values for a Common Set a Green Checkmark will appear to the left of the Common Set signifying the review and lock-in process has been completed for that the Common Set. The Completed Common Set Example image listed below will show you what a Common Set will look like once it has been Completed.
Completed Common Set Example
Common Set Review Needed
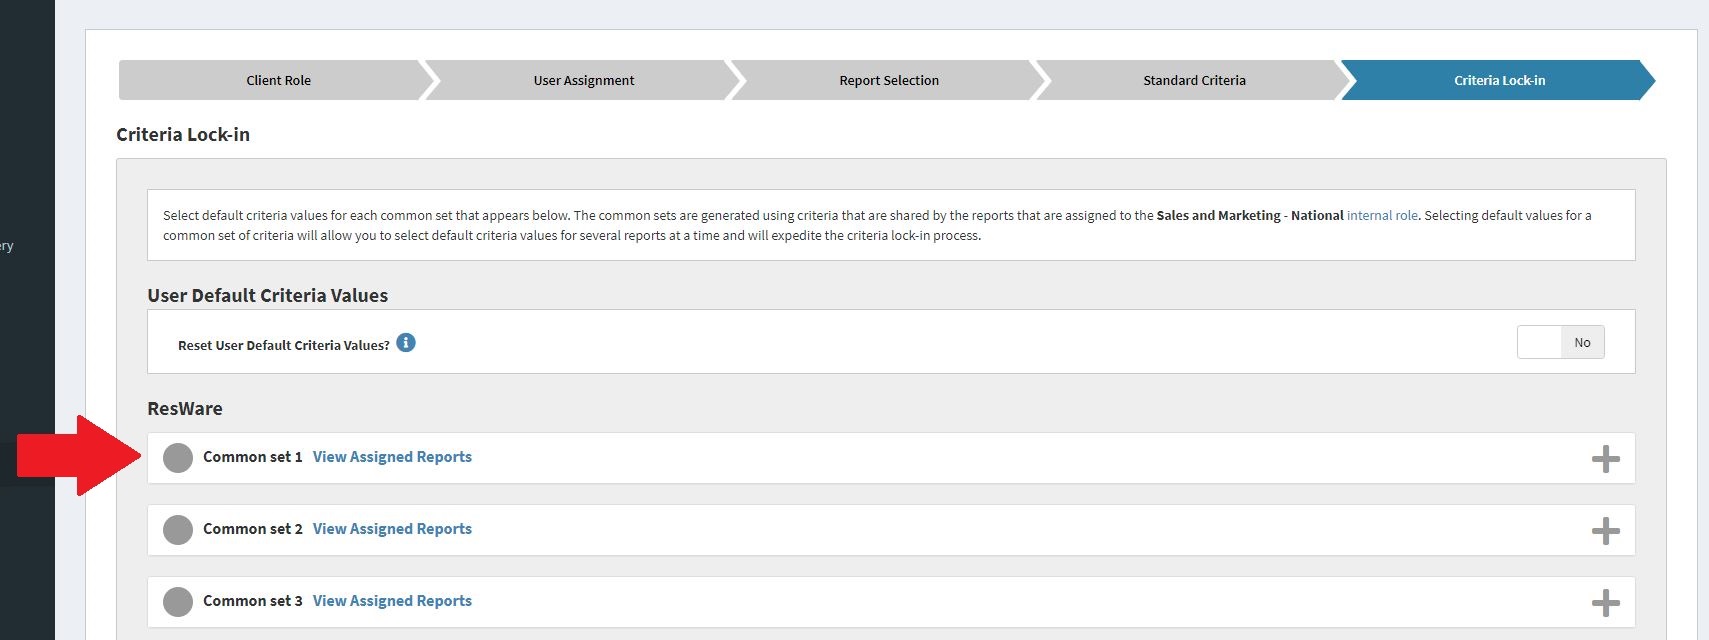
If you have NOT Locked-in Default Criteria values for a Common Set a Grey Circle will appear to the left of the Common Set signifying the review and lock-in process has NOT been completed for that the Common Set. The Common Set Review Needed Example image listed below will show you what a Common Set will look like when it still Needs to be Reviewed.
Common Set Review Needed Example
Complete the Criteria Lock-in Step
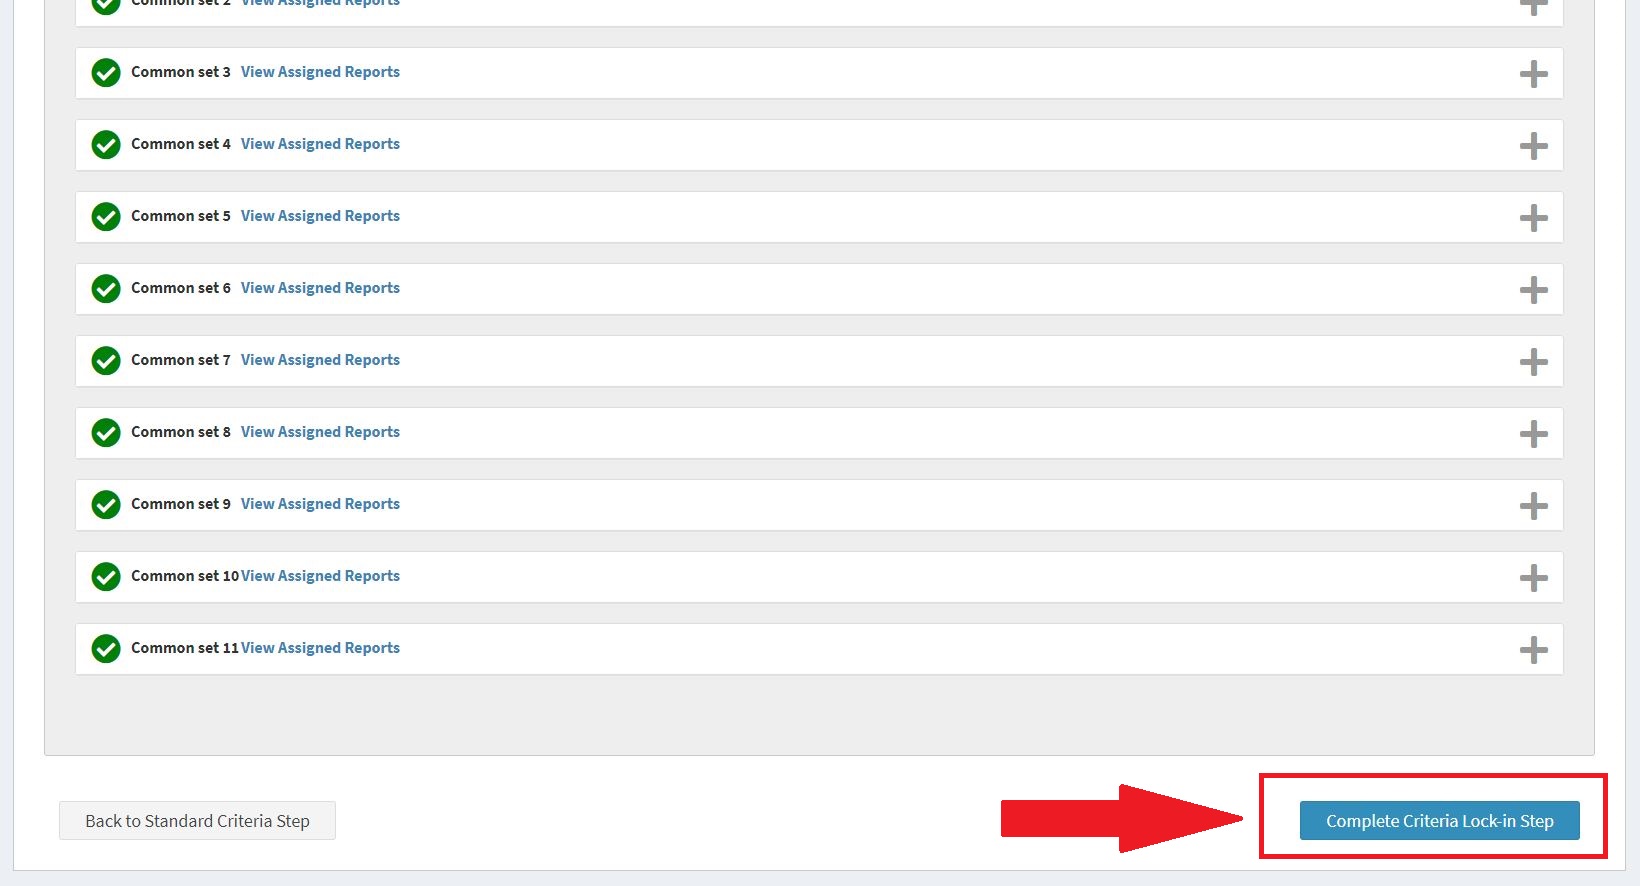
After all the Common Sets have been Completed, you’re ready to Complete the Criteria Lock-in Step. To do this, you must click the Complete Criteria Lock-in Step button that appears at the bottom of the Criteria Lock-in Step. The Complete the Criteria Lock-in Step Example image listed below will show you where the Complete Criteria Lock-in Step button appears in the Criteria Lock-in Step.
Complete the Criteria Lock-in Step Example
Complete the Criteria Lock-in Step Warning Message
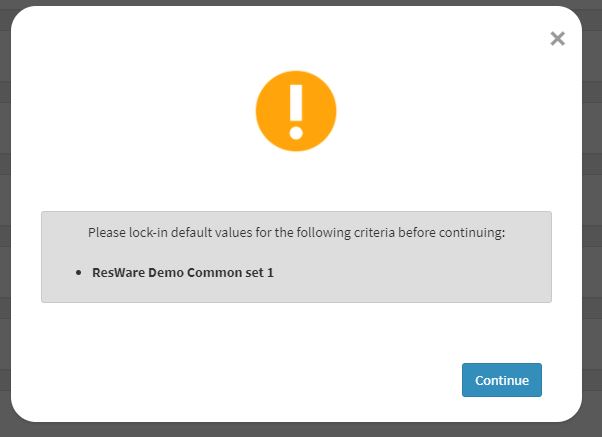
If you attempt to Complete the Criteria Lock-in Step without Completing one or more Common Sets, you’ll receive a warning message that prompts you to lock-in default values for each Common Set before continuing. This message will appear each time you attempt to Complete the Criteria Lock-in Step until all Common Sets have been Completed. The Complete the Criteria Lock-in Step Warning Message Example image listed below will show you what the Complete the Criteria Lock-in Step Warning Message will look like.
Complete the Criteria Lock-in Step Warning Message Example